Boarding pass (PDF417) — 100×60 mm
Boarding pass with passenger, seat, flight, gate, zone, route and PDF417 barcode in IATA BCBP format.
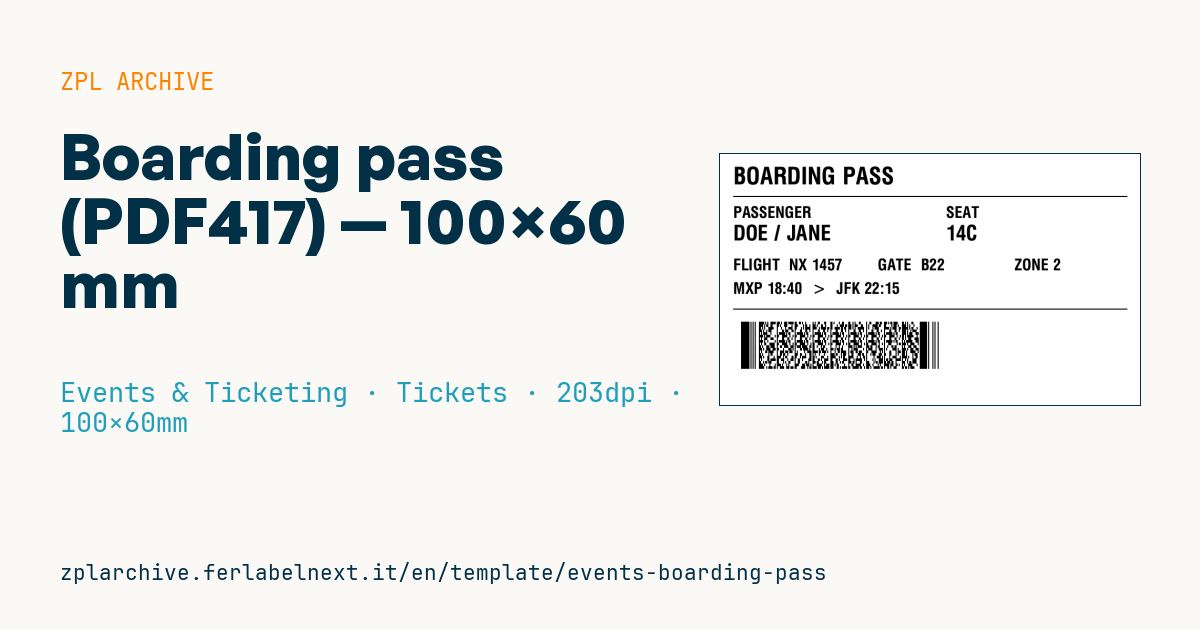
Boarding pass
100×60 mm @ 203 dpi. The PDF417 follows the IATA BCBP format (Bar Coded Boarding Pass), read at the boarding gates. The bcbp payload is the full BCBP string.
Placeholders
passenger— passenger (SURNAME/NAME)seat— seatflight— flight numbergate— gatezone— boarding zoneroute— route with timesbcbp— BCBP string in the PDF417
When to use it
Paper boarding passes are printed at check-in desks, self-service kiosks and at the gate when a passenger has no mobile version or it is rejected. The PDF417 is scanned at security, automated gates and boarding, where the system checks the data against the flight and assigned seat. The same layout also suits training, boarding drills and airport-themed event access.
The media is usually direct thermal card stock: the pass has to last the whole journey, connections included, and survive folding and repeated passes through readers.
Standards and requirements
The PDF417 content follows the IATA BCBP standard, defined by IATA Resolution 792. The string is made of fixed-length fields: passenger name, booking reference (PNR), three-letter IATA airport codes, carrier, flight number, flight date as day of the year, seat and check-in sequence number. The symbology itself is specified in ISO/IEC 15438.
The string must be generated by the airline's or handler's departure control system: the template prints it as it is. In ZPL the PDF417 is printed with ^B7, where you can set the security level, columns and rows; increase the row height if the gate scanner struggles.
Common mistakes
- Stripping the padding spaces from the BCBP string: fixed-length fields shift and decoding fails.
- Writing the date as day/month instead of the day of the year BCBP requires.
- Squeezing the PDF417 horizontally to fit the layout, leaving modules too narrow for 203 dpi.
- Using
^FHwithout need: an_in the name is read as a hex escape prefix.
FAQ
What is stored in a boarding pass barcode?
The BCBP data: name, PNR, route, carrier, flight, date, seat and check-in sequence, plus optional fields defined by the airline.
Can I use a QR code instead of PDF417?
BCBP specifies PDF417 for printed passes and other 2D symbols for mobile. On paper, stay with PDF417 unless the airline or airport tells you otherwise.
ZPL code
^XA
^LL480
^CI28
^PW800
^CF0,45^FO25,25^FDBOARDING PASS^FS
^FO25,80^GB750,2,2^FS
^CF0,30^FO25,100^FDPASSENGER^FS
^CF0,40^FO25,135^FD{{passenger}}^FS
^CF0,30^FO430,100^FDSEAT^FS
^CF0,40^FO430,135^FD{{seat}}^FS
^CF0,30^FO25,200^FDFLIGHT  {{flight}}^FS
^FO300,200^FDGATE  {{gate}}^FS
^FO560,200^FDZONE {{zone}}^FS
^CF0,30^FO25,245^FD{{route}}^FS
^FO25,295^GB750,2,2^FS
^FO40,320^B7N,5,5,7,18,N^FD{{bcbp}}^FS
^XZ- Industry: Events & Ticketing
- Category: Tickets
- DPI: 203
- Size: 100×60 mm
- Tags: Access control, PDF417, Ticket
What this label contains
Barcodes
- PDF417
- Stacked 2D code with high capacity: boarding passes, ID documents and shipping.
Elements
- 9 text fields
- 7 variable fields to fill in
- boxes and separator lines
Variable fields
| Field | Description | Example |
|---|---|---|
passenger | Passenger | DOE / JANE |
seat | Seat | 14C |
flight | Flight | NX 1457 |
gate | Gate | B22 |
zone | Zone | 2 |
route | Route | MXP 18:40 > JFK 22:15 |
bcbp | BCBP | M1DOE/JANE ENX1457 MXPJFK 042 14C |
Format and printing
100×60 mm (3.94×2.36″) at 203 dpi: 799×480 dots. Landscape.
Compatible Zebra printers
You need a printer with a 4″ printhead at 203 dpi, for example:
- Zebra ZD421 (desktop)
- Zebra ZD621 (desktop)
- Zebra GK420 (desktop)
- Zebra ZT231 (industrial)
- Zebra ZT411 (industrial)
- Zebra ZT610 (industrial)
- Zebra ZQ521 (mobile)
- Zebra ZQ630 (mobile)
Any Zebra printer with a wider printhead and the same resolution works too.
The code is written for 203 dpi: on a printer with a different resolution the label prints larger or smaller and needs rescaling.
How to use it
- Open “Customize placeholders” and enter your data in the variable fields listed above.
- Check the preview: it is rendered from the same ZPL code you will send to the printer.
- Download the .zpl file or copy the code and send it to the printer: with “Print” through Zebra Browser Print, or as a raw file to port 9100 if the printer is on the network.
- Load 100×60 mm labels and make sure the printer is set to 203 dpi. For a different size use “Duplicate & edit” and adapt the layout in the builder.
Edit it in the editor
To change the layout, use “Duplicate & edit”: the template opens in the online ZPL editor, where you modify it and save it to your account for free.
Related templates
- Press pass — 100×70 mm 203 dpi · Events & Ticketing · Accreditation & access
- Event admission ticket — 100×50 mm 203 dpi · Events & Ticketing · Tickets
- Concert seated ticket — 100×60 mm 203 dpi · Events & Ticketing · Seating & cloakroom
- Retail gift card with logo — 65×40 mm 300 dpi · Events & Ticketing · Vouchers & tokens
- Gift voucher — 85×54 mm CR80 300 dpi · Events & Ticketing · Vouchers & tokens
- Cashless festival wristband — 250×25 mm 203 dpi · Events & Ticketing · Accreditation & access
- Drink token — 40×40 mm 203 dpi · Events & Ticketing · Vouchers & tokens
- Stadium / sports ticket — 100×70 mm 203 dpi · Events & Ticketing · Seating & cloakroom