Press pass — 100×70 mm
Press accreditation for events: PRESS banner, event and dates, name, role, outlet, access zones, pass ID and verification DataMatrix.
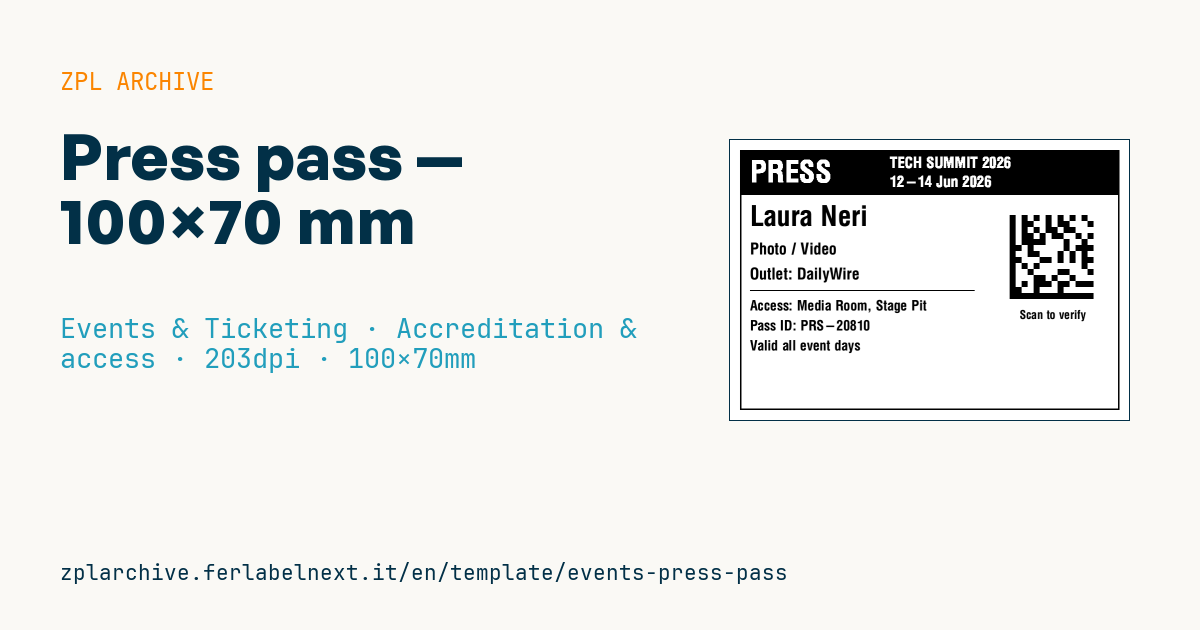
Press pass
100×70 mm lanyard format for press accreditation. Reversed PRESS banner for immediate recognizability; the DataMatrix encodes the pass ID for verification at media-restricted entrances.
Placeholders
event_name,event_dates— event and datesfull_name— accredited personrole— role (e.g.Photo / Video)outlet— media outletaccess_zones— zones with access (e.g.Media Room, Stage Pit)pass_id— pass ID (also in the DataMatrix)
When to use it
Press offices at festivals, sports events, trade fairs and conferences use it to accredit journalists, photographers and video crews. The pass is printed at the accreditation desk after the request has been checked and worn on a lanyard or in a badge holder. Stewards check it by eye at the press room, the photo pit or the mixed zone, and scan the DataMatrix when a system check is needed.
The pass must last the whole event, sometimes several days outdoors: synthetic stock or sturdy card in thermal transfer holds up better than thermal paper, which fades in the sun on a festival site.
Standards and requirements
DataMatrix ECC 200 is defined by ISO/IEC 16022, and 2D quality is graded under ISO/IEC 15415. There is no standard for press accreditation: access rules are set by the organiser. Name, outlet and role are personal data, so in the EU GDPR (Regulation (EU) 2016/679) applies: print only what the check requires.
In ZPL the DataMatrix is printed with ^BXN, and quality 200; at 203 dpi use a module height of at least 4-5 dots for reliable reading with handhelds. If the stock has a lanyard hole, keep that area clear.
Common mistakes
- Listing too many zones in small type: stewards need to understand access in a second.
- Not voiding a lost pass in the system, so it stays valid for whoever finds it.
- Printing the DataMatrix too small for the stewards' scanners.
- Using the same layout for press and staff, so the PRESS banner no longer stands out.
FAQ
What should a press pass include?
Usually the event, name, outlet, role, access zones and a verifiable ID. Some organisers add a photo: the rules depend on the event.
Why use DataMatrix instead of QR?
DataMatrix stays very compact for a short ID and reads well even when small. Either works for a pass: what matters is what the stewards' scanners read.
ZPL code
^XA
^PW800
^LL559
^CI28
^FO20,20^GB760,520,3^FS
^FO20,20^GB760,90,90^FS
^CF0,60^FO40,40^FR^FDPRESS^FS
^CF0,30^FO320,34^FR^FD{{event_name}}^FS
^CF0,30^FO320,72^FR^FD{{event_dates}}^FS
^CF0,56^FO40,130^FD{{full_name}}^FS
^CF0,32^FO40,205^FD{{role}}^FS
^FO40,255^FDOutlet: {{outlet}}^FS
^FO40,300^GB450,2,2^FS
^CF0,28^FO40,320^FDAccess: {{access_zones}}^FS
^FO40,360^FDPass ID: {{pass_id}}^FS
^FO40,400^FDValid all event days^FS
^FO560,150^BXN,12,200^FD{{pass_id}}^FS
^CF0,24^FO580,340^FDScan to verify^FS
^XZ- Industry: Events & Ticketing
- Category: Accreditation & access
- DPI: 203
- Size: 100×70 mm
- Tags: Access control, DataMatrix, Event, Press
What this label contains
Barcodes
- Data Matrix
- Very compact 2D code, readable even at a few millimetres: component marking, PCBs and asset tags.
Elements
- 10 text fields
- 7 variable fields to fill in
- boxes and separator lines
Variable fields
| Field | Description | Example |
|---|---|---|
event_name | Event | TECH SUMMIT 2026 |
event_dates | Dates | 12-14 Jun 2026 |
full_name | Name | Laura Neri |
role | Role | Photo / Video |
outlet | Outlet | DailyWire |
access_zones | Access zones | Media Room, Stage Pit |
pass_id | Pass ID | PRS-20810 |
Format and printing
100×70 mm (3.94×2.76″) at 203 dpi: 799×559 dots. Landscape.
Compatible Zebra printers
You need a printer with a 4″ printhead at 203 dpi, for example:
- Zebra ZD421 (desktop)
- Zebra ZD621 (desktop)
- Zebra GK420 (desktop)
- Zebra ZT231 (industrial)
- Zebra ZT411 (industrial)
- Zebra ZT610 (industrial)
- Zebra ZQ521 (mobile)
- Zebra ZQ630 (mobile)
Any Zebra printer with a wider printhead and the same resolution works too.
The code is written for 203 dpi: on a printer with a different resolution the label prints larger or smaller and needs rescaling.
How to use it
- Open “Customize placeholders” and enter your data in the variable fields listed above.
- Check the preview: it is rendered from the same ZPL code you will send to the printer.
- Download the .zpl file or copy the code and send it to the printer: with “Print” through Zebra Browser Print, or as a raw file to port 9100 if the printer is on the network.
- Load 100×70 mm labels and make sure the printer is set to 203 dpi. For a different size use “Duplicate & edit” and adapt the layout in the builder.
Edit it in the editor
To change the layout, use “Duplicate & edit”: the template opens in the online ZPL editor, where you modify it and save it to your account for free.
Related templates
- Event admission ticket — 100×50 mm 203 dpi · Events & Ticketing · Tickets
- Boarding pass (PDF417) — 100×60 mm 203 dpi · Events & Ticketing · Tickets
- Concert seated ticket — 100×60 mm 203 dpi · Events & Ticketing · Seating & cloakroom
- Retail gift card with logo — 65×40 mm 300 dpi · Events & Ticketing · Vouchers & tokens
- Gift voucher — 85×54 mm CR80 300 dpi · Events & Ticketing · Vouchers & tokens
- Cashless festival wristband — 250×25 mm 203 dpi · Events & Ticketing · Accreditation & access
- Drink token — 40×40 mm 203 dpi · Events & Ticketing · Vouchers & tokens
- Stadium / sports ticket — 100×70 mm 203 dpi · Events & Ticketing · Seating & cloakroom