Concert seated ticket — 100×60 mm
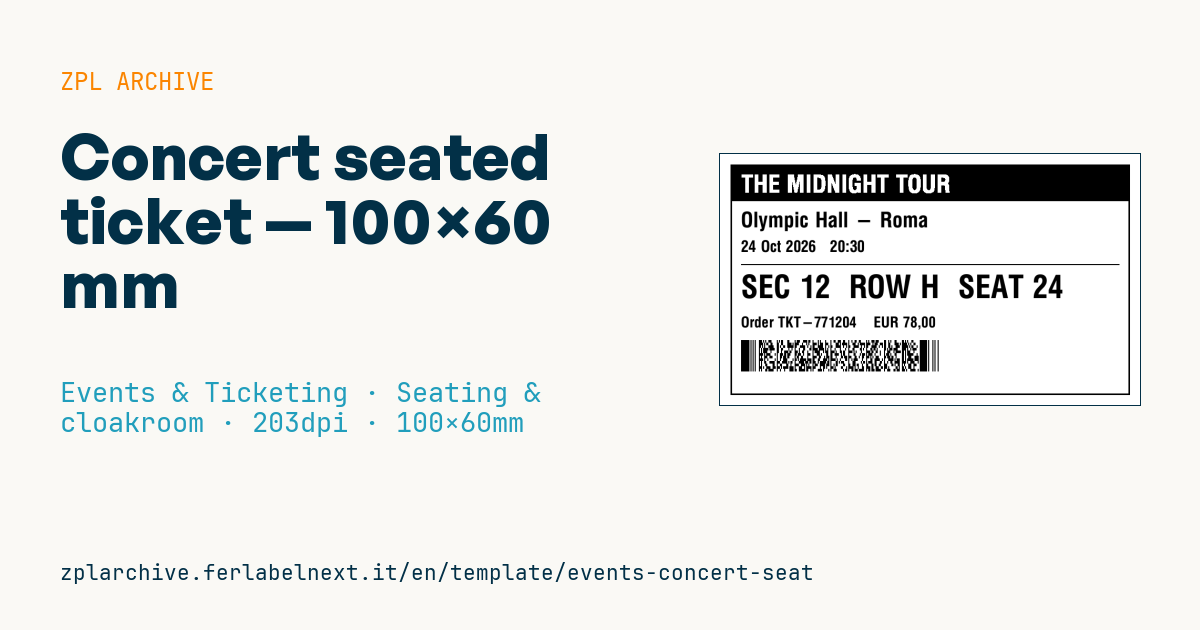
Reserved-seat ticket for concerts with tour, venue, date, section/row/seat in large type and PDF417 for validation.
Concert seated ticket
100×60 mm format for concerts with an assigned seat. Section/row/seat in large type for the usher's quick read. The PDF417 encodes the ticket data for validation.
Placeholders
tour_name— tour name (banner)venue,event_date,start_timesection,row,seatorder_no,pricebarcode_data— string in the PDF417
When to use it
Promoters and box offices for arenas, theatres and venues with numbered seating use it. The ticket goes through two checks: the gate scanner, which reads the PDF417 and rejects duplicates, and the usher inside, who reads section, row and seat to guide the guest. It is printed at presale, at the box office or in batches for complimentary tickets.
The stock is direct thermal ticket card, often with a black mark. For a concert announced months ahead, the ticket sits in a drawer for a long time: choose good-quality thermal stock and keep it away from heat and light.
Standards and requirements
PDF417 is defined by ISO/IEC 15438, and 2D quality is verified under ISO/IEC 15415. There is no international standard for seated ticket content: the string format inside the PDF417 is set by the ticketing system. Tax obligations and rules on named tickets vary by country and event type, so check with your ticketing provider.
In ZPL, use ^B7 and set columns and security level: more columns make the symbol wide and short, more rows make it tall and narrow. With 100 mm of width available, a wide symbol works best, with rows at least three times the module width set with ^BY.
Common mistakes
- Printing the same seat twice after a seating map change without voiding the old ticket.
- Shrinking section, row and seat to make room for the tour name: ushers need to read them in the dark.
- Putting personal data into the PDF417 that validation does not need.
- Using a security level that is too low: one fold across the code is enough to make it unreadable.
FAQ
Why do concert tickets use PDF417?
It is a 2D symbol that holds a lot of data in little space and reads well with both linear-scan and imaging scanners. Many ticketing systems use it for historical reasons, others have moved to QR.
How do you prevent duplicate tickets?
Every code must be unique and checked against the issued list: on first scan it is marked as used and every later copy is rejected.
ZPL code
^XA
^LL480
^CI28
^PW800
^FO20,20^GB760,440,3^FS
^FO20,20^GB760,70,70^FS
^CF0,46^FO40,40^FR^FD{{tour_name}}^FS
^CF0,40^FO40,110^FD{{venue}}^FS
^CF0,30^FO40,165^FD{{event_date}}   {{start_time}}^FS
^FO40,210^GB720,2,2^FS
^CF0,60^FO40,230^FDSEC {{section}}  ROW {{row}}  SEAT {{seat}}^FS
^CF0,28^FO40,310^FDOrder {{order_no}}    {{price}}^FS
^BY2,3^FO40,355^B7N,5,5,7,0,N^FD{{barcode_data}}^FS
^XZ- Industry: Events & Ticketing
- Category: Seating & cloakroom
- DPI: 203
- Size: 100×60 mm
- Tags: Concert, Event, PDF417, Seating, Ticket
What this label contains
Barcodes
- PDF417
- Stacked 2D code with high capacity: boarding passes, ID documents and shipping.
Elements
- 5 text fields
- 10 variable fields to fill in
- boxes and separator lines
Variable fields
| Field | Description | Example |
|---|---|---|
tour_name | Tour | THE MIDNIGHT TOUR |
venue | Venue | Olympic Hall - Roma |
event_date | Date | 24 Oct 2026 |
start_time | Start | 20:30 |
section | Section | 12 |
row | Row | H |
seat | Seat | 24 |
order_no | Order | TKT-771204 |
price | Price | EUR 78,00 |
barcode_data | Barcode data | TKT-771204|S12|RH|24 |
Format and printing
100×60 mm (3.94×2.36″) at 203 dpi: 799×480 dots. Landscape.
Compatible Zebra printers
You need a printer with a 4″ printhead at 203 dpi, for example:
- Zebra ZD421 (desktop)
- Zebra ZD621 (desktop)
- Zebra GK420 (desktop)
- Zebra ZT231 (industrial)
- Zebra ZT411 (industrial)
- Zebra ZT610 (industrial)
- Zebra ZQ521 (mobile)
- Zebra ZQ630 (mobile)
Any Zebra printer with a wider printhead and the same resolution works too.
The code is written for 203 dpi: on a printer with a different resolution the label prints larger or smaller and needs rescaling.
How to use it
- Open “Customize placeholders” and enter your data in the variable fields listed above.
- Check the preview: it is rendered from the same ZPL code you will send to the printer.
- Download the .zpl file or copy the code and send it to the printer: with “Print” through Zebra Browser Print, or as a raw file to port 9100 if the printer is on the network.
- Load 100×60 mm labels and make sure the printer is set to 203 dpi. For a different size use “Duplicate & edit” and adapt the layout in the builder.
Edit it in the editor
To change the layout, use “Duplicate & edit”: the template opens in the online ZPL editor, where you modify it and save it to your account for free.
Related templates
- Press pass — 100×70 mm 203 dpi · Events & Ticketing · Accreditation & access
- Event admission ticket — 100×50 mm 203 dpi · Events & Ticketing · Tickets
- Boarding pass (PDF417) — 100×60 mm 203 dpi · Events & Ticketing · Tickets
- Retail gift card with logo — 65×40 mm 300 dpi · Events & Ticketing · Vouchers & tokens
- Gift voucher — 85×54 mm CR80 300 dpi · Events & Ticketing · Vouchers & tokens
- Cashless festival wristband — 250×25 mm 203 dpi · Events & Ticketing · Accreditation & access
- Drink token — 40×40 mm 203 dpi · Events & Ticketing · Vouchers & tokens
- Stadium / sports ticket — 100×70 mm 203 dpi · Events & Ticketing · Seating & cloakroom