Artisan jam label with logo — 50×60 mm
Artisan jam label with logo area, brand, product name, fruit, net weight and best-before date.
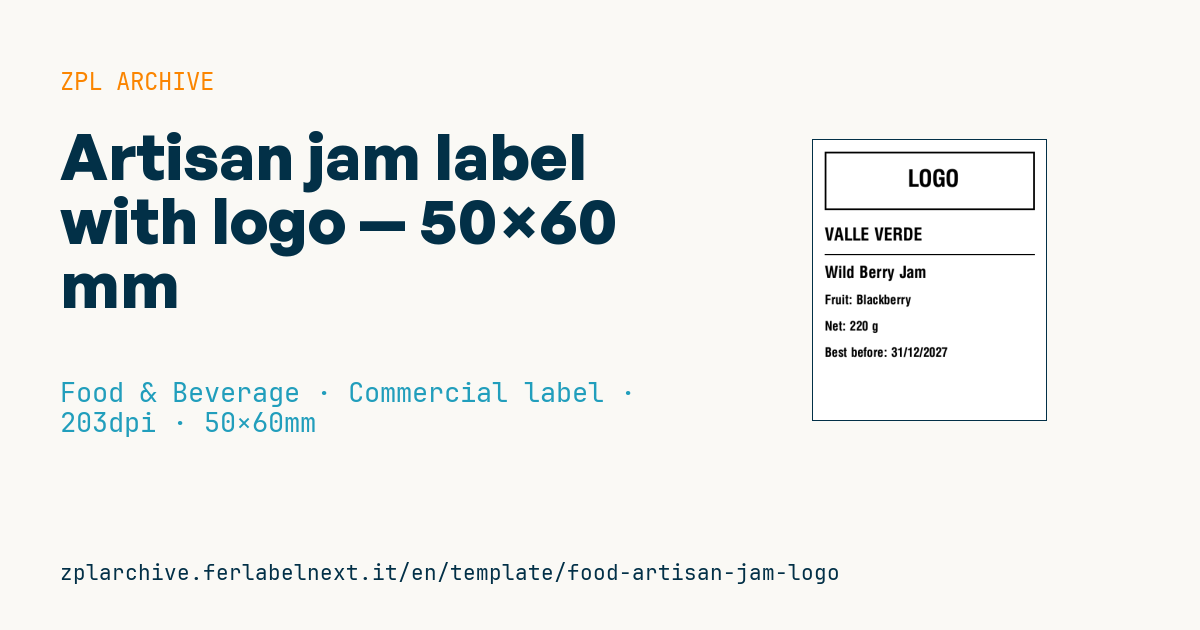
Artisan jam label with logo
50×60 mm @ 203 dpi (^PW400). Vertical label applied to the jam jar. At the top the logo area: a placeholder frame with "LOGO" text, to be replaced with the real brand logo (^GF image).
Placeholders
brandproduct_name— product name (e.g.Wild Berry Jam)fruit— fruit usednet_weight— net weightbest_before— best-before date
The "LOGO" frame is a placeholder: replace it with your logo as a graphic (
^GF).
When to use it
The label goes on the glass jar for farms, farm stays and small workshops selling jams and marmalades in their own shop, at farmers' markets or in specialty stores. Label the jar after it has cooled and the glass is dry, otherwise condensation stops the adhesive from bonding. Jams often keep for many months in a pantry or on a shelf: direct thermal paper fades with light and heat, so thermal transfer on paper or polypropylene with a glass-grade adhesive is the safer choice.
Standards and requirements
Besides Regulation (EU) No 1169/2011, which requires among other things the ingredients list, the operator's name and address and the lot, Directive 2001/113/EC on fruit jams applies, as transposed nationally: it defines reserved names and requires you to state the fruit used and the total sugar content in grams per 100 g of product. Check the version in force and your country's transposing rules. For net quantity, the figures need a minimum height that depends on the amount: for a jar between 200 and 1000 g it is 4 mm. The best-before date is given as day, month and year, or only month and year, depending on shelf life.
At 203 dpi, 4 mm is about 32 dots: check the height of the printed figures, not just the font parameter.
Common mistakes
- Leaving out fruit used and total sugar per 100 g, which the template does not include.
- Labelling the jar while still warm or wet, so the label lifts or bubbles.
- Using direct thermal on a product that sits for months in a sunny shop window.
- Printing the net weight with figures smaller than the required minimum.
FAQ
Do I need a nutrition table on homemade jam I sell?
Not always: Annex V of Regulation 1169/2011 exempts some handcrafted foods supplied in small quantities directly to consumers or local shops. Interpretation varies, so check with your competent authority.
What does "prepared with X g of fruit per 100 g" mean?
It states how many grams of fruit were used to make 100 g of jam. It is a mandatory statement under the jam directive.
ZPL code
^XA
^LL480
^CI28
^PW400
^FO20,20^GB360,100,3^FS
^CF0,40^FO150,50^FD LOGO ^FS
^CF0,30^FO20,150^FD{{brand}}^FS
^FO20,195^GB360,2,2^FS
^CF0,28^FO20,215^FD{{product_name}}^FS
^CF0,22^FO20,265^FDFruit: {{fruit}}^FS
^FO20,310^FDNet: {{net_weight}}^FS
^FO20,355^FDBest before: {{best_before}}^FS
^XZ- Industry: Food & Beverage
- Category: Commercial label
- DPI: 203
- Size: 50×60 mm
- Tags: Food, Gourmet, Handmade, Logo
What this label contains
Barcodes
This label contains no barcodes: it is made of text and graphics.
Elements
- 6 text fields
- 5 variable fields to fill in
- boxes and separator lines
Variable fields
| Field | Description | Example |
|---|---|---|
brand | Brand | VALLE VERDE |
product_name | Product | Wild Berry Jam |
fruit | Fruit | Blackberry |
net_weight | Net weight | 220 g |
best_before | Best before | 31/12/2027 |
Format and printing
50×60 mm (1.97×2.36″) at 203 dpi: 400×480 dots. Portrait.
Compatible Zebra printers
You need a printer with a 2″ printhead at 203 dpi, for example:
- Zebra ZD411 (desktop)
- Zebra ZD611 (desktop)
- Zebra ZQ220 (mobile)
- Zebra ZQ310 (mobile)
Any Zebra printer with a wider printhead and the same resolution works too.
The code is written for 203 dpi: on a printer with a different resolution the label prints larger or smaller and needs rescaling.
How to use it
- Open “Customize placeholders” and enter your data in the variable fields listed above.
- Check the preview: it is rendered from the same ZPL code you will send to the printer.
- Download the .zpl file or copy the code and send it to the printer: with “Print” through Zebra Browser Print, or as a raw file to port 9100 if the printer is on the network.
- Load 50×60 mm labels and make sure the printer is set to 203 dpi. For a different size use “Duplicate & edit” and adapt the layout in the builder.
Edit it in the editor
To change the layout, use “Duplicate & edit”: the template opens in the online ZPL editor, where you modify it and save it to your account for free.
Related templates
- Wine gift label with logo — 50×90 mm 300 dpi · Food & Beverage · Commercial label
- Beverage bottle label — 40×80 mm 300 dpi · Food & Beverage · Commercial label
- Food label with allergens — 70×100 mm 300 dpi · Food & Beverage · Commercial label
- GS1 DataMatrix traceability — 30×30 mm 300 dpi · Food & Beverage · GS1 DataMatrix
- Cooking instructions label — 70×50 mm 203 dpi · Food & Beverage · Commercial label
- Price per kg label — 50×40 mm 203 dpi · Food & Beverage · Commercial label
- Food nutrition label — 70×100 mm 300 dpi · Food & Beverage · Nutritional label
- Compact lot + expiry — 50×25 mm 300 dpi · Food & Beverage · Traceability