Cinema ticket — 80×40 mm
Compact cinema ticket: venue, movie, screen, seat, date, time, format (2D/3D), Code 128 and price.
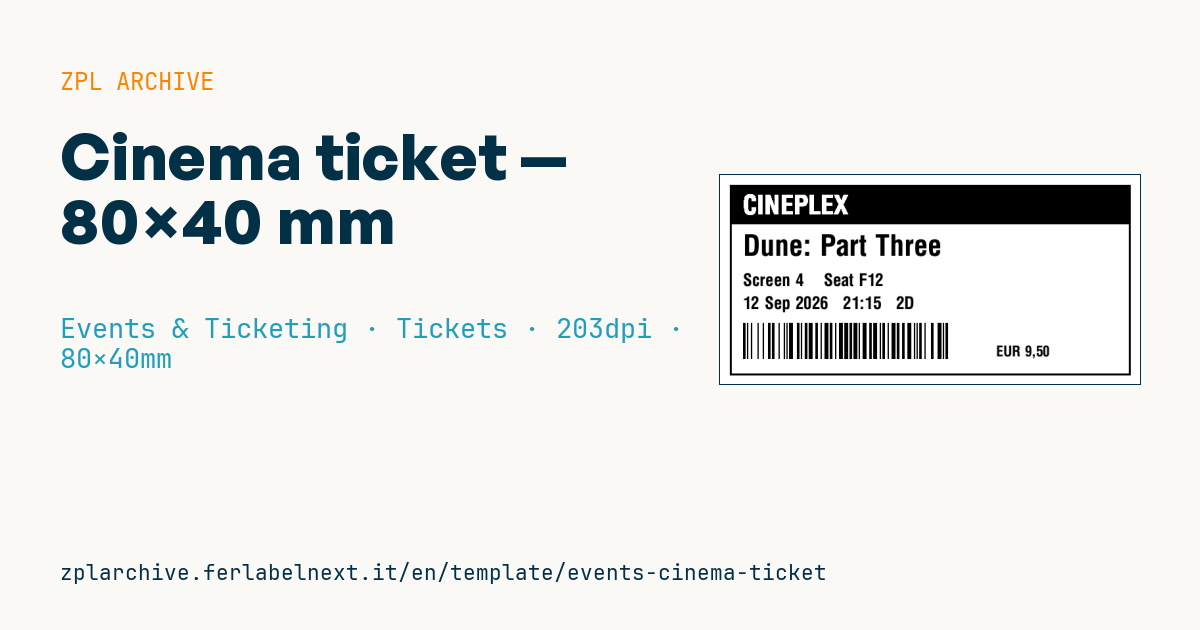
Cinema ticket
Compact 80×40 mm format for cinema box office. The Code 128 encodes the ticket number for validation at the screen entrance.
Placeholders
cinema_name— venue (banner)movie_title— movie titlescreen,seatshow_date,show_time,format— date, time, 2D/3Dticket_no— ticket number (also in the barcode)price
When to use it
Cinema box offices, multiplexes, arthouse venues and self-service kiosks print it after payment. At the screen entrance, staff scan the Code 128 with a linear scanner or simply check screen, time and seat by eye; small venues often just tear the stub.
The 80×40 mm format runs on direct thermal ticket rolls, the same used by box office printers. The ticket lives for a few hours, but it has to stay readable in a dark auditorium and after time in a pocket or bag.
Standards and requirements
Code 128 is defined by ISO/IEC 15417, and linear print quality is graded under ISO/IEC 15416. There is no specific standard for cinema ticket layout: the practical requirements are a unique number, adequate contrast and screen details readable at a glance. Tax rules for issuing tickets depend on the country and the certified point-of-sale system, so check what your software has to print.
In ZPL, ^BC in mode A picks subsets automatically and compresses digits; a numeric-only ticket_no with an even length gives a shorter barcode. On 80 mm stock, set ^PW to the actual roll width.
Common mistakes
- Using a ticket number that is too long: on 80 mm the bars get narrow and scans fail.
- Placing the barcode near the tear edge and losing the side quiet zone.
- Not clearly separating 2D, 3D and original-language screenings, which causes disputes at the door.
- Storing rolls warm or in sunlight: thermal stock greys out before it is even printed.
FAQ
What paper do I need to print cinema tickets?
Direct thermal ticket stock on rolls, in a thickness your printer supports. For collectible tickets or special premieres consider a top-coated thermal stock.
Is a barcode on a cinema ticket required?
No, many venues check by eye. The barcode matters if you want automatic validation, admission statistics or blocking of tickets already used.
ZPL code
^XA
^LL320
^CI28
^PW640
^FO15,15^GB610,290,3^FS
^FO15,15^GB610,60,60^FS
^CF0,40^FO35,30^FR^FD{{cinema_name}}^FS
^CF0,44^FO35,90^FD{{movie_title}}^FS
^CF0,26^FO35,150^FDScreen {{screen}}    Seat {{seat}}^FS
^FO35,185^FD{{show_date}}   {{show_time}}   {{format}}^FS
^BY2,2,55^FO35,225^BCN,55,N,N,N^FD{{ticket_no}}^FS
^CF0,22^FO420,260^FD{{price}}^FS
^XZ- Industry: Events & Ticketing
- Category: Tickets
- DPI: 203
- Size: 80×40 mm
- Tags: Cinema, Code 128, Event, Seating, Ticket
What this label contains
Barcodes
- Code 128
- High-density linear barcode that encodes the full ASCII set: ideal for tracking numbers, internal codes and alphanumeric IDs.
Elements
- 5 text fields
- 9 variable fields to fill in
- boxes and separator lines
Variable fields
| Field | Description | Example |
|---|---|---|
cinema_name | Venue | CINEPLEX |
movie_title | Movie | Dune: Part Three |
screen | Screen | 4 |
seat | Seat | F12 |
show_date | Date | 12 Sep 2026 |
show_time | Time | 21:15 |
format | Format | 2D |
ticket_no | Ticket no | CIN-4471902 |
price | Price | EUR 9,50 |
Format and printing
80×40 mm (3.15×1.57″) at 203 dpi: 639×320 dots. Landscape.
Compatible Zebra printers
You need a printer with a 4″ printhead at 203 dpi, for example:
- Zebra ZD421 (desktop)
- Zebra ZD621 (desktop)
- Zebra GK420 (desktop)
- Zebra ZT231 (industrial)
- Zebra ZT411 (industrial)
- Zebra ZT610 (industrial)
- Zebra ZQ521 (mobile)
- Zebra ZQ630 (mobile)
Any Zebra printer with a wider printhead and the same resolution works too.
The code is written for 203 dpi: on a printer with a different resolution the label prints larger or smaller and needs rescaling.
How to use it
- Open “Customize placeholders” and enter your data in the variable fields listed above.
- Check the preview: it is rendered from the same ZPL code you will send to the printer.
- Download the .zpl file or copy the code and send it to the printer: with “Print” through Zebra Browser Print, or as a raw file to port 9100 if the printer is on the network.
- Load 80×40 mm labels and make sure the printer is set to 203 dpi. For a different size use “Duplicate & edit” and adapt the layout in the builder.
Edit it in the editor
To change the layout, use “Duplicate & edit”: the template opens in the online ZPL editor, where you modify it and save it to your account for free.
Related templates
- Press pass — 100×70 mm 203 dpi · Events & Ticketing · Accreditation & access
- Event admission ticket — 100×50 mm 203 dpi · Events & Ticketing · Tickets
- Boarding pass (PDF417) — 100×60 mm 203 dpi · Events & Ticketing · Tickets
- Concert seated ticket — 100×60 mm 203 dpi · Events & Ticketing · Seating & cloakroom
- Gift voucher — 85×54 mm CR80 300 dpi · Events & Ticketing · Vouchers & tokens
- Retail gift card with logo — 65×40 mm 300 dpi · Events & Ticketing · Vouchers & tokens
- Cashless festival wristband — 250×25 mm 203 dpi · Events & Ticketing · Accreditation & access
- Drink token — 40×40 mm 203 dpi · Events & Ticketing · Vouchers & tokens