Museum / exhibition ticket — 60×90 mm
Vertical ticket for museums and exhibitions: museum, exhibition, type, validity, entry time, price and a large QR for the turnstiles.
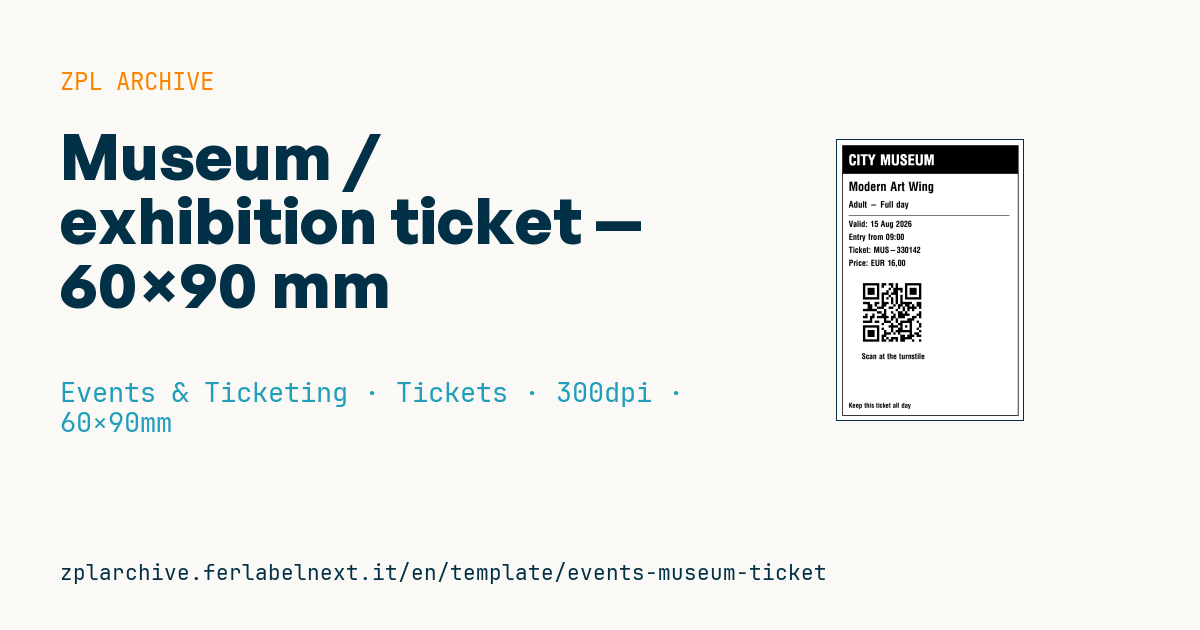
Museum / exhibition ticket
Vertical 60×90 mm format at 300 dpi for museums and exhibitions. Large QR for quick reading at turnstiles; clean layout with no icons.
Placeholders
museum_name— museum (banner)exhibition— exhibition/wingticket_type— type (e.g.Adult - Full day)valid_date— validityentry_time— entry timeticket_no— ticket numberpriceticket_url— URL in the QR
When to use it
Museums, temporary exhibitions, archaeological sites and exhibition centres with a desk or kiosk box office use it. The visitor holds the QR up to the fixed scanner on the turnstile, which opens the gate and checks that the ticket is valid for that day, that exhibition and, with timed entry, that slot. The same ticket can be checked again at the entrance to a wing or a separately priced exhibition.
The vertical 300 dpi format is printed on thermal ticket rolls. Many visitors keep the ticket as a souvenir or bookmark: if that matters, choose top-coated stock or thermal transfer, because direct thermal fades with light and heat.
Standards and requirements
QR is defined by ISO/IEC 18004 and 2D print quality is graded under ISO/IEC 15415. There is no specific standard for museum tickets: the practical requirements are clear validity, a readable fare type and a QR the turnstile reads first time. For reduced or free admission, eligibility depends on the museum and local rules.
At 300 dpi a ^BQN,2,6 magnification gives modules of about 0.5 mm. Turnstile scanners read at a fixed distance, so check with the supplier the minimum and maximum symbol size they handle well.
Common mistakes
- Placing the QR where visitors hold the ticket, so their fingers cover it at the scanner.
- Printing the time slot too small: staff need to read it at a glance.
- Not visibly distinguishing full, reduced and free tickets, forcing slow manual checks.
- Leaving the QR valid for several days when the ticket covers a single date.
FAQ
How does timed entry work with a printed ticket?
The system links the code to a date and time; the turnstile accepts it only within that window, with whatever tolerance the museum sets.
Can visitors re-enter with the same ticket?
It depends on the museum's rules. The access system can accept one or several passes per code, but it has to be configured: the printed ticket stays the same.
ZPL code
^XA
^LL1063
^CI28
^PW720
^FO20,20^GB680,1040,3^FS
^FO20,20^GB680,110,110^FS
^CF0,56^FO45,55^FR^FD{{museum_name}}^FS
^CF0,48^FO45,160^FD{{exhibition}}^FS
^CF0,34^FO45,235^FD{{ticket_type}}^FS
^FO45,290^GB620,2,2^FS
^CF0,32^FO45,310^FDValid: {{valid_date}}^FS
^FO45,360^FDEntry from {{entry_time}}^FS
^FO45,410^FDTicket: {{ticket_no}}^FS
^FO45,460^FDPrice: {{price}}^FS
^FO100,540^BQN,2,9^FDLA,{{ticket_url}}^FS
^CF0,30^FO95,820^FDScan at the turnstile^FS
^CF0,26^FO45,1010^FDKeep this ticket all day^FS
^XZ- Industry: Events & Ticketing
- Category: Tickets
- DPI: 300
- Size: 60×90 mm
- Tags: Event, Museum, QR Code, Ticket, Ticketing
What this label contains
Barcodes
- QR Code
- 2D code for links, text and structured data, readable by any smartphone.
Elements
- 9 text fields
- 8 variable fields to fill in
- boxes and separator lines
Variable fields
| Field | Description | Example |
|---|---|---|
museum_name | Museum | CITY MUSEUM |
exhibition | Exhibition | Modern Art Wing |
ticket_type | Type | Adult - Full day |
valid_date | Valid | 15 Aug 2026 |
entry_time | Entry | 09:00 |
ticket_no | Ticket no | MUS-330142 |
price | Price | EUR 16,00 |
ticket_url | Ticket URL | https://tix.example/m/MUS-330142 |
Format and printing
60×90 mm (2.36×3.54″) at 300 dpi: 709×1063 dots. Portrait.
Compatible Zebra printers
You need a printer with a 4″ printhead at 300 dpi, for example:
- Zebra ZD421 (desktop)
- Zebra ZD621 (desktop)
- Zebra ZT231 (industrial)
- Zebra ZT411 (industrial)
- Zebra ZT610 (industrial)
Any Zebra printer with a wider printhead and the same resolution works too.
The code is written for 300 dpi: on a printer with a different resolution the label prints larger or smaller and needs rescaling.
How to use it
- Open “Customize placeholders” and enter your data in the variable fields listed above.
- Check the preview: it is rendered from the same ZPL code you will send to the printer.
- Download the .zpl file or copy the code and send it to the printer: with “Print” through Zebra Browser Print, or as a raw file to port 9100 if the printer is on the network.
- Load 60×90 mm labels and make sure the printer is set to 300 dpi. For a different size use “Duplicate & edit” and adapt the layout in the builder.
Edit it in the editor
To change the layout, use “Duplicate & edit”: the template opens in the online ZPL editor, where you modify it and save it to your account for free.
Related templates
- Press pass — 100×70 mm 203 dpi · Events & Ticketing · Accreditation & access
- Event admission ticket — 100×50 mm 203 dpi · Events & Ticketing · Tickets
- Boarding pass (PDF417) — 100×60 mm 203 dpi · Events & Ticketing · Tickets
- Concert seated ticket — 100×60 mm 203 dpi · Events & Ticketing · Seating & cloakroom
- Retail gift card with logo — 65×40 mm 300 dpi · Events & Ticketing · Vouchers & tokens
- Gift voucher — 85×54 mm CR80 300 dpi · Events & Ticketing · Vouchers & tokens
- Cashless festival wristband — 250×25 mm 203 dpi · Events & Ticketing · Accreditation & access
- Drink token — 40×40 mm 203 dpi · Events & Ticketing · Vouchers & tokens