Emergency assembly point — 100×100 mm
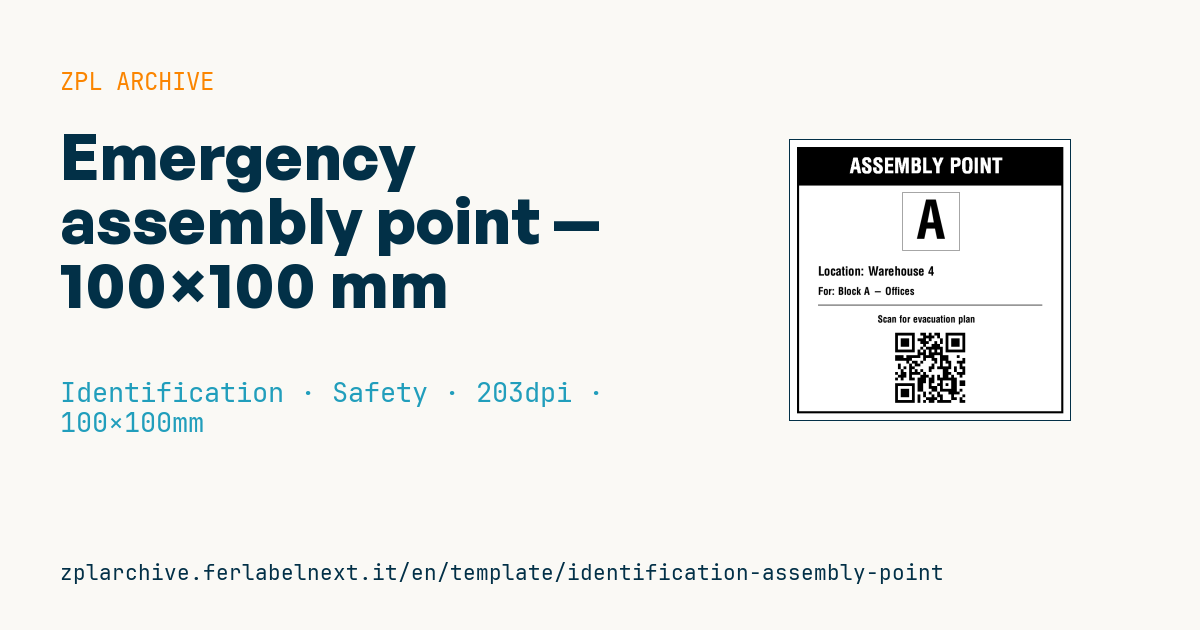
Assembly point sign: ASSEMBLY POINT banner, large identifier letter, location, building served and QR to the evacuation plan.
Assembly point
100×100 mm format. The identifier letter is large for at-a-distance visibility; the QR links to the digital evacuation plan.
Placeholders
point_id— point letter/number (e.g.A)location— physical locationbuilding— building/block servedplan_url— evacuation plan URL (QR)
The people+arrow pictogram can be added via ^GF with the image→ZPL system.
When to use it
Safety officers, facility managers and EHS staff at plants, warehouses, schools and offices use this sign to identify the assembly points set out in the emergency plan. It is mounted on a post, fence or outside wall, so it must withstand sun, rain and frost for years: thermal transfer with a resin ribbon on polyester or outdoor vinyl, laminated if possible.
The large letter lets emergency teams call "everyone to point B" without ambiguity; the QR is for anyone who wants to check the current site plan.
Standards and requirements
The standard assembly point symbol is E007 in ISO 7010, in the green safety colour defined by ISO 3864. Directive 92/58/EEC on safety signs at work requires signs with defined shapes and colours. A monochrome thermal print cannot reproduce green, so use it on pre-printed green stock or as an information panel next to a compliant sign.
For the QR keep a quiet zone of at least 4 modules and use high error correction (^BQN,2,8 with ^FDHA,), because outdoor signs get dirty.
Common mistakes
- Using a black-and-white print as the only assembly point sign.
- Printing on direct thermal media, which becomes unreadable in the sun within weeks.
- Assigning letters that differ from those in the emergency plan and floor plans.
- Linking the QR to a document behind a login or one that is never updated.
FAQ
What colour must an assembly point sign be?
Green with a white symbol, per ISO 7010 E007. A monochrome print is fine only for supplementary information or on pre-printed stock.
How many assembly points do I need?
That depends on the building's risk assessment and emergency plan, not on the sign; check with your safety manager.
Does the QR replace the posted evacuation plan?
No. Evacuation plans stay posted inside the building; the QR is an additional quick reference.
ZPL code
^XA
^LL799
^CI28
^PW800
^FO20,20^GB760,760,6^FS
^FO20,20^GB760,110,110^FS
^CF0,60^FO170,50^FR^FDASSEMBLY POINT^FS
^FO320,150
^GB165,165,1^FS
^CF0,150^FO360,170^FD{{point_id}}^FS
^CF0,36^FO80,360^FDLocation: {{location}}^FS
^CF0,30^FO80,420^FDFor: {{building}}^FS
^FO80,470^GB640,2,2^FS
^CF0,28^FO250,500^FDScan for evacuation plan^FS
^FO300,540^BQN,2,8^FDLA,{{plan_url}}^FS
^XZ- Industry: Identification
- Category: Safety
- DPI: 203
- Size: 100×100 mm
- Tags: Assembly point, Emergency, Identification, QR Code, Safety
What this label contains
Barcodes
- QR Code
- 2D code for links, text and structured data, readable by any smartphone.
Elements
- 5 text fields
- 4 variable fields to fill in
- boxes and separator lines
Variable fields
| Field | Description | Example |
|---|---|---|
point_id | Point | A |
location | Location | Warehouse 4 |
building | Building | Block A - Offices |
plan_url | Plan URL | https://safety.example/evac/A |
Format and printing
100×100 mm (3.94×3.94″) at 203 dpi: 799×799 dots. Square.
Compatible Zebra printers
You need a printer with a 4″ printhead at 203 dpi, for example:
- Zebra ZD421 (desktop)
- Zebra ZD621 (desktop)
- Zebra GK420 (desktop)
- Zebra ZT231 (industrial)
- Zebra ZT411 (industrial)
- Zebra ZT610 (industrial)
- Zebra ZQ521 (mobile)
- Zebra ZQ630 (mobile)
Any Zebra printer with a wider printhead and the same resolution works too.
The code is written for 203 dpi: on a printer with a different resolution the label prints larger or smaller and needs rescaling.
How to use it
- Open “Customize placeholders” and enter your data in the variable fields listed above.
- Check the preview: it is rendered from the same ZPL code you will send to the printer.
- Download the .zpl file or copy the code and send it to the printer: with “Print” through Zebra Browser Print, or as a raw file to port 9100 if the printer is on the network.
- Load 100×100 mm labels and make sure the printer is set to 203 dpi. For a different size use “Duplicate & edit” and adapt the layout in the builder.
Edit it in the editor
To change the layout, use “Duplicate & edit”: the template opens in the online ZPL editor, where you modify it and save it to your account for free.
Related templates
- Lockout/Tagout tag — 70×100 mm 203 dpi · Identification · Safety
- Parking permit — 100×60 mm 203 dpi · Identification · Badge
- VIP / backstage pass (QR) — 100×70 mm 300 dpi · Identification · Badge
- Tamper-evident security seal — 80×20 mm 203 dpi · Identification · Safety
- Contractor badge — 54×86 mm CR80 300 dpi · Identification · Badge
- Document confidentiality label — 70×40 mm 203 dpi · Identification · Documents
- Membership card — 86×54 mm CR80 300 dpi · Identification · Badge
- File folder spine label — 90×30 mm 203 dpi · Identification · Documents