Lockout/Tagout tag — 70×100 mm
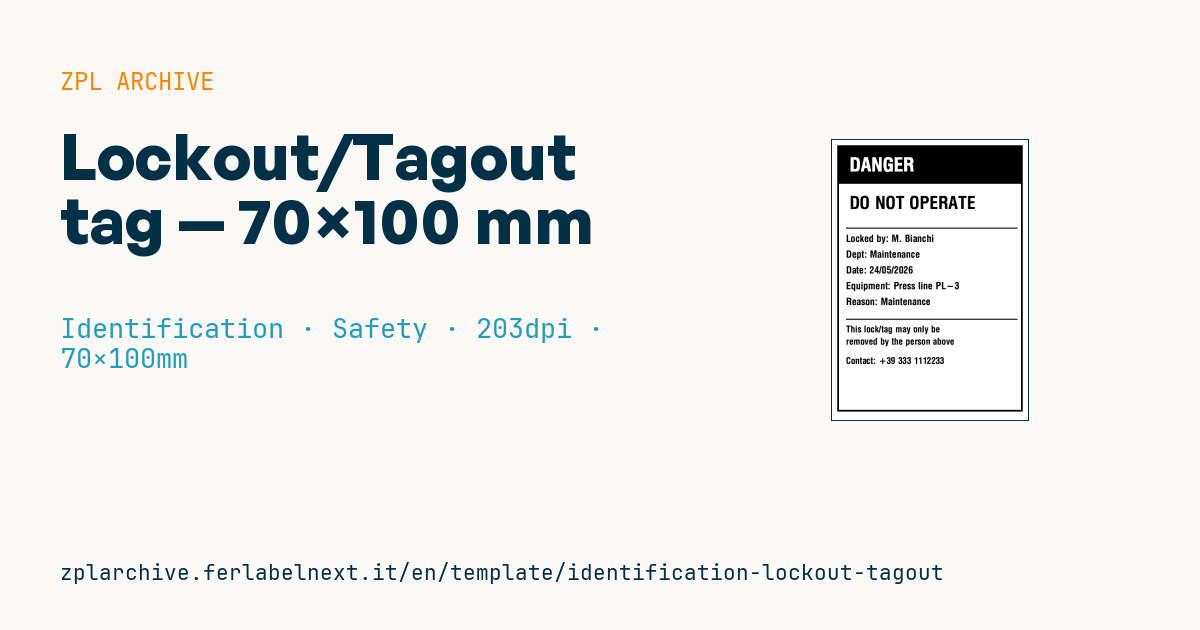
LOTO machine-lock tag: DANGER DO NOT OPERATE banner, operator, department, date, equipment, reason and contact.
Lockout/Tagout (LOTO)
70×100 mm format (portrait) to apply on switches/valves locked during maintenance. Reversed DANGER banner. Only the named person may remove the lock.
Placeholders
locked_by— operator applying the lockdepartmentlock_date— application dateequipment— machine/plantreason— reason (e.g.Maintenance)contact_phone— contact
When to use it
Maintenance technicians, electricians and supervisors use this tag when they isolate a machine or system from electrical, pneumatic, hydraulic or thermal energy before working on it. It hangs from the padlock or lockout device on the isolator or valve and tells everyone who locked it out, why, and how to reach them. It has to resist oil, moisture and abrasion: print by thermal transfer with a resin ribbon on synthetic tag stock with a reinforced eyelet, not on paper adhesive labels.
Standards and requirements
In the United States the procedure is governed by OSHA 29 CFR 1910.147, which requires durable, standardised and substantial tags with warnings such as "Do Not Start" or "Do Not Operate"; the format of signal words such as DANGER is defined by ANSI Z535.5. In Europe, Directive 2009/104/EC on work equipment requires that energy sources can be isolated, and EN ISO 14118 covers prevention of unexpected start-up.
The ANSI DANGER panel is red, so with a monochrome printer use pre-printed tag stock. Record the time as well as the date.
Common mistakes
- Using the tag without a padlock: on its own it does not stop anyone restarting the machine.
- Hanging a single tag when several people are working: each person applies their own.
- Printing on adhesive paper that falls off or dissolves with oil and wash-downs.
- Writing a vague reason that does not explain what is being worked on.
FAQ
Can a LOTO tag replace the padlock?
Only in the limited cases where your procedure allows it and the device cannot be locked; the rule is lock plus tag.
Who can remove the tag?
Only the person who applied it, unless a written procedure covers removal in their absence, including a check that they are not on site.
How long must a tag last?
At least as long as the maintenance work, in the actual environment; OSHA requires tags not to deteriorate or become illegible under the conditions of use.
ZPL code
^XA
^LL799
^CI28
^PW560
^FO15,15^GB530,760,5^FS
^FO15,15^GB530,110,110^FS
^CF0,54^FO50,50^FR^FDDANGER^FS
^CF0,50^FO50,160^FDDO NOT OPERATE^FS
^FO40,250^GB490,3,3^FS
^CF0,28^FO40,270^FDLocked by: {{locked_by}}^FS
^FO40,315^FDDept: {{department}}^FS
^FO40,360^FDDate: {{lock_date}}^FS
^FO40,405^FDEquipment: {{equipment}}^FS
^FO40,450^FDReason: {{reason}}^FS
^FO40,510^GB490,3,3^FS
^CF0,26^FO40,530^FDThis lock/tag may only be^FS
^FO40,565^FDremoved by the person above^FS
^FO40,620^FDContact: {{contact_phone}}^FS
^XZ- Industry: Identification
- Category: Safety
- DPI: 203
- Size: 70×100 mm
- Tags: Identification, Lockout/Tagout, Safety
What this label contains
Barcodes
This label contains no barcodes: it is made of text and graphics.
Elements
- 10 text fields
- 6 variable fields to fill in
- boxes and separator lines
Variable fields
| Field | Description | Example |
|---|---|---|
locked_by | Locked by | M. Bianchi |
department | Department | Maintenance |
lock_date | Date | 24/05/2026 |
equipment | Equipment | Press line PL-3 |
reason | Reason | Maintenance |
contact_phone | Contact | +39 333 1112233 |
Format and printing
70×100 mm (2.76×3.94″) at 203 dpi: 559×799 dots. Portrait.
Compatible Zebra printers
You need a printer with a 4″ printhead at 203 dpi, for example:
- Zebra ZD421 (desktop)
- Zebra ZD621 (desktop)
- Zebra GK420 (desktop)
- Zebra ZT231 (industrial)
- Zebra ZT411 (industrial)
- Zebra ZT610 (industrial)
- Zebra ZQ521 (mobile)
- Zebra ZQ630 (mobile)
Any Zebra printer with a wider printhead and the same resolution works too.
The code is written for 203 dpi: on a printer with a different resolution the label prints larger or smaller and needs rescaling.
How to use it
- Open “Customize placeholders” and enter your data in the variable fields listed above.
- Check the preview: it is rendered from the same ZPL code you will send to the printer.
- Download the .zpl file or copy the code and send it to the printer: with “Print” through Zebra Browser Print, or as a raw file to port 9100 if the printer is on the network.
- Load 70×100 mm labels and make sure the printer is set to 203 dpi. For a different size use “Duplicate & edit” and adapt the layout in the builder.
Edit it in the editor
To change the layout, use “Duplicate & edit”: the template opens in the online ZPL editor, where you modify it and save it to your account for free.
Related templates
- Parking permit — 100×60 mm 203 dpi · Identification · Badge
- VIP / backstage pass (QR) — 100×70 mm 300 dpi · Identification · Badge
- Tamper-evident security seal — 80×20 mm 203 dpi · Identification · Safety
- Contractor badge — 54×86 mm CR80 300 dpi · Identification · Badge
- Membership card — 86×54 mm CR80 300 dpi · Identification · Badge
- Document confidentiality label — 70×40 mm 203 dpi · Identification · Documents
- File folder spine label — 90×30 mm 203 dpi · Identification · Documents
- Evidence chain of custody — 100×50 mm 203 dpi · Identification · Documents