Parking permit — 100×60 mm
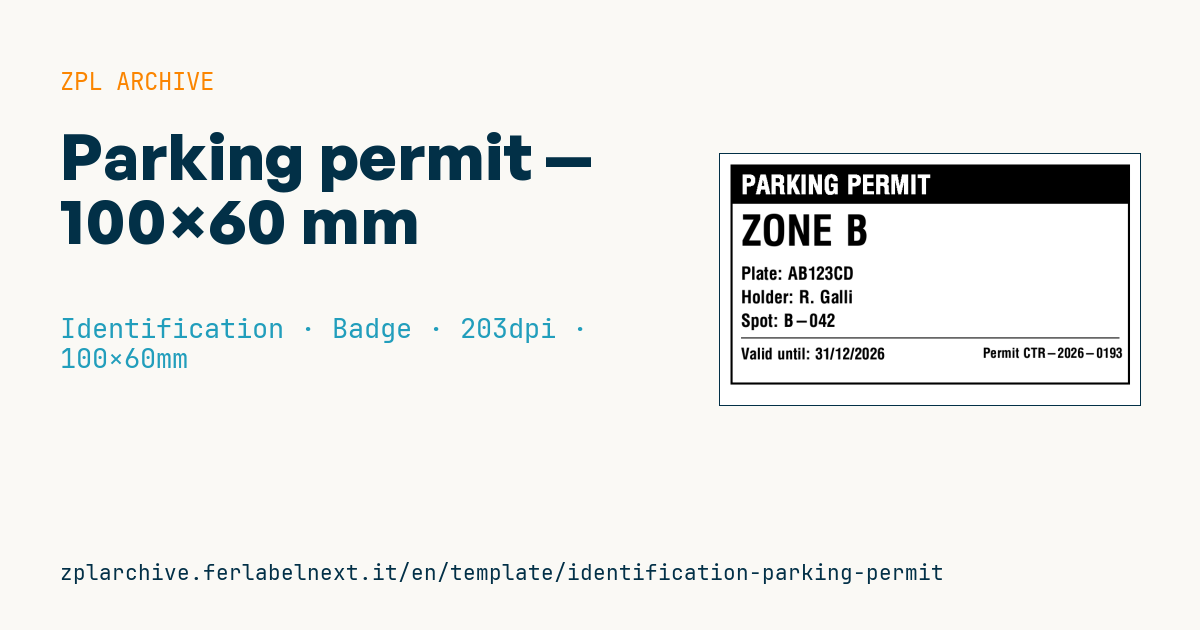
Dashboard parking permit: zone in large type, plate, holder, parking spot, validity and permit number.
Parking permit
100×60 mm format to display on the dashboard. The zone is in very large type for the attendant's at-a-glance check.
Placeholders
-
zone— parking zone/area (e.g.ZONE B) -
plate— vehicle plate -
holder— permit holder -
spot— assigned spot -
valid_until—dd/mm/yyyy -
permit_no— permit number
When to use it
Companies, hospitals, universities, residential buildings and private car park operators use this permit to authorise employees, residents or suppliers to park in restricted areas. It sits behind the windscreen, where summer temperatures easily exceed 60 °C and the sun shines for hours: direct thermal paper darkens or fades within weeks. Use thermal transfer with a resin ribbon on polypropylene or polyester, ideally UV-protected.
Standards and requirements
For private car parks there is no format standard; what matters are the site's own rules and legibility for enforcement staff. This template is not suitable for official permits such as the disabled parking card, which follows the European model in Council Recommendation 98/376/EC and is issued by public authorities.
The plate number is personal data, so consider whether to print the holder's name as well, since anyone walking past the car can read it. For faster checks you can add a Code 128 or QR with the permit number (^BC or ^BQ) to verify with a handheld.
Common mistakes
- Printing a permit that stays on the dashboard for months on direct thermal media.
- Writing the plate with spaces or hyphens that differ from those in the enforcement database.
- Using a date like
05/06/2027at a site with international staff or visitors, who may swap day and month. - Renewing the permit with the same number, so enforcement staff cannot tell old from new.
FAQ
Does the permit need the holder's name?
It is not needed for enforcement, which relies on plate, zone and permit number. You can leave it off to reduce the personal data on display.
How do I prevent counterfeits?
Use non-sequential permit numbers, change the layout or media colour at each renewal, and check the number against an up-to-date list or with a barcode.
Why does the zone have to be so large?
Staff check permits through the windscreen while walking along a row of cars; a zone readable from a couple of metres speeds up the round.
ZPL code
^XA
^LL480
^CI28
^PW800
^FO20,20^GB760,420,4^FS
^FO20,20^GB760,75,75^FS
^CF0,50^FO40,40^FR^FDPARKING PERMIT^FS
^CF0,80^FO40,115^FD{{zone}}^FS
^CF0,34^FO40,215^FDPlate: {{plate}}^FS
^FO40,260^FDHolder: {{holder}}^FS
^FO40,305^FDSpot: {{spot}}^FS
^FO40,350^GB720,2,2^FS
^CF0,30^FO40,370^FDValid until: {{valid_until}}^FS
^CF0,26^FO500,370^FDPermit {{permit_no}}^FS
^XZ- Industry: Identification
- Category: Badge
- DPI: 203
- Size: 100×60 mm
- Tags: Access control, Identification, Parking
What this label contains
Barcodes
This label contains no barcodes: it is made of text and graphics.
Elements
- 7 text fields
- 6 variable fields to fill in
- boxes and separator lines
Variable fields
| Field | Description | Example |
|---|---|---|
zone | Zone | ZONE B |
plate | Plate | AB123CD |
holder | Holder | R. Galli |
spot | Spot | B-042 |
valid_until | Valid until | 31/12/2026 |
permit_no | Permit no | CTR-2026-0193 |
Format and printing
100×60 mm (3.94×2.36″) at 203 dpi: 799×480 dots. Landscape.
Compatible Zebra printers
You need a printer with a 4″ printhead at 203 dpi, for example:
- Zebra ZD421 (desktop)
- Zebra ZD621 (desktop)
- Zebra GK420 (desktop)
- Zebra ZT231 (industrial)
- Zebra ZT411 (industrial)
- Zebra ZT610 (industrial)
- Zebra ZQ521 (mobile)
- Zebra ZQ630 (mobile)
Any Zebra printer with a wider printhead and the same resolution works too.
The code is written for 203 dpi: on a printer with a different resolution the label prints larger or smaller and needs rescaling.
How to use it
- Open “Customize placeholders” and enter your data in the variable fields listed above.
- Check the preview: it is rendered from the same ZPL code you will send to the printer.
- Download the .zpl file or copy the code and send it to the printer: with “Print” through Zebra Browser Print, or as a raw file to port 9100 if the printer is on the network.
- Load 100×60 mm labels and make sure the printer is set to 203 dpi. For a different size use “Duplicate & edit” and adapt the layout in the builder.
Edit it in the editor
To change the layout, use “Duplicate & edit”: the template opens in the online ZPL editor, where you modify it and save it to your account for free.
Related templates
- Lockout/Tagout tag — 70×100 mm 203 dpi · Identification · Safety
- VIP / backstage pass (QR) — 100×70 mm 300 dpi · Identification · Badge
- Tamper-evident security seal — 80×20 mm 203 dpi · Identification · Safety
- Contractor badge — 54×86 mm CR80 300 dpi · Identification · Badge
- Membership card — 86×54 mm CR80 300 dpi · Identification · Badge
- Document confidentiality label — 70×40 mm 203 dpi · Identification · Documents
- File folder spine label — 90×30 mm 203 dpi · Identification · Documents
- Evidence chain of custody — 100×50 mm 203 dpi · Identification · Documents