Emergency exit sign — 100×100 mm
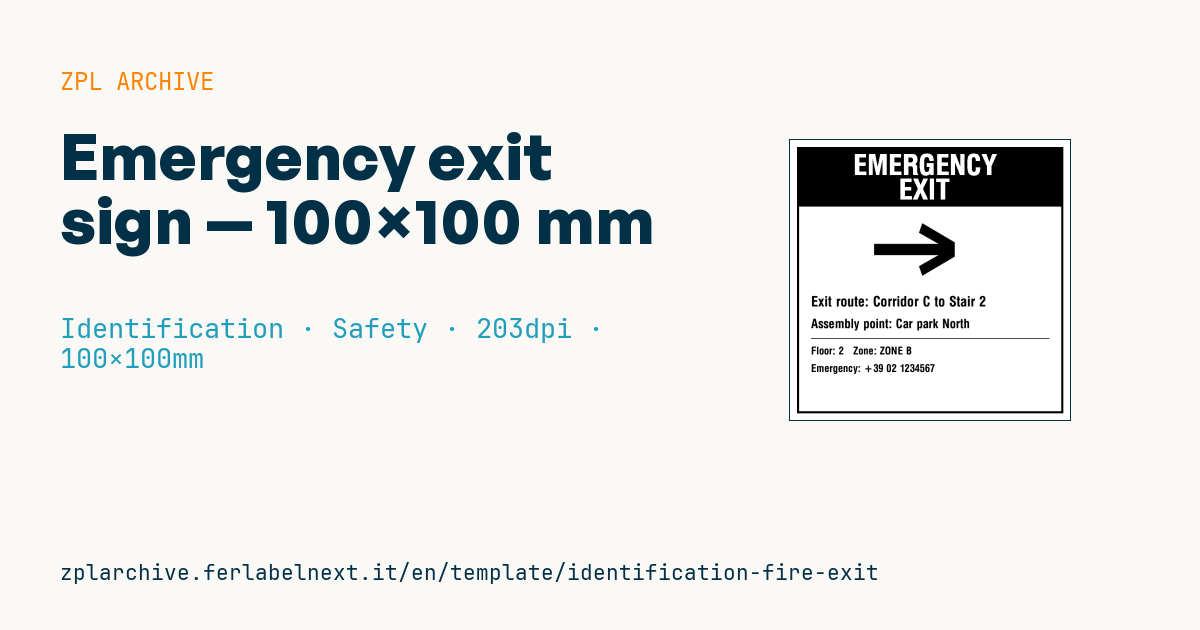
Emergency exit sign with EMERGENCY EXIT banner, geometric directional arrow, route, assembly point, floor/zone and emergency number.
Emergency exit
100×100 mm format. The arrow is geometric (^GB body + ^GD head): to flip the direction, mirror the coordinates. Designed for at-a-distance wayfinding along escape routes.
Placeholders
route— escape routeassembly— assembly pointfloor,zone— floor and zoneemergency_phone— emergency number
A running-man/door icon can be added via ^GF with the image→ZPL system.
When to use it
Safety managers and maintenance staff in warehouses, industrial buildings, offices and hotels use this sign to supplement escape-route signage with local information: exit direction, route, linked assembly point, floor, zone and the number to call. It is especially useful after layout changes, when updated directions are needed quickly. Indoors, coated paper or polypropylene printed by thermal transfer is enough; near glazing or in hot areas use polyester with a resin ribbon.
Standards and requirements
The standard emergency exit signs are E001 and E002 in ISO 7010 (left and right hand), green with a white pictogram as defined by ISO 3864; Directive 92/58/EEC governs their use at work. Signs must stay visible during a power failure, through emergency lighting or photoluminescent material. A black-and-white thermal print does not meet these requirements, so use it as a supplementary panel next to the compliant sign.
To reverse the arrow, mirror the x of each ^GB and ^GD across the ^PW800 width, taking the element's own width into account (x' = 800 − x − width), and swap the ^GD orientation (R ↔ L), then print a test before putting the sign up.
Common mistakes
- Using this sign instead of the standard green sign or the emergency luminaire.
- Leaving the arrow pointing the wrong way after copying the file for another corridor.
- Showing an internal number that nobody answers out of hours; in the EU the single emergency number is 112.
- Naming an assembly point that differs from the one in the emergency plan.
FAQ
Is a black-and-white printed exit sign compliant?
Not as a safety sign: it needs the ISO 7010 shape, colour and pictogram. As a supplementary information sign it is fine, provided it does not contradict the official signage.
Does the sign have to be photoluminescent?
Visibility during a power failure is mandatory; it is achieved with emergency lighting or photoluminescent signs, according to the building's fire safety design.
Can I print the sign larger?
Yes, but the width depends on the printhead, not on the dpi: on 4" printers the printable width is about 104 mm. For larger signs you need a 6" or 8" model, or several labels side by side.
ZPL code
^XA
^LL799
^CI28
^PW800
^FO20,20^GB760,760,6^FS
^FO20,20^GB760,170,170^FS
^CF0,80^FO180,40^FR^FDEMERGENCY^FS
^CF0,80^FO310,110^FR^FDEXIT^FS
^FO240,100^A0N,450,320^FD→^FS
^CF0,40^FO60,445^FDExit route: {{route}}^FS
^CF0,36^FO60,510^FDAssembly point: {{assembly}}^FS
^FO60,565^GB680,2,2^FS
^CF0,30^FO60,590^FDFloor: {{floor}}   Zone: {{zone}}^FS
^FO60,640^FDEmergency: {{emergency_phone}}^FS
^XZ- Industry: Identification
- Category: Safety
- DPI: 203
- Size: 100×100 mm
- Tags: Emergency, Identification, Safety
What this label contains
Barcodes
This label contains no barcodes: it is made of text and graphics.
Elements
- 7 text fields
- 5 variable fields to fill in
- boxes and separator lines
Variable fields
| Field | Description | Example |
|---|---|---|
route | Route | Corridor C to Stair 2 |
assembly | Assembly | Car park North |
floor | Floor | 2 |
zone | Zone | ZONE B |
emergency_phone | Emergency | +39 02 1234567 |
Format and printing
100×100 mm (3.94×3.94″) at 203 dpi: 799×799 dots. Square.
Compatible Zebra printers
You need a printer with a 4″ printhead at 203 dpi, for example:
- Zebra ZD421 (desktop)
- Zebra ZD621 (desktop)
- Zebra GK420 (desktop)
- Zebra ZT231 (industrial)
- Zebra ZT411 (industrial)
- Zebra ZT610 (industrial)
- Zebra ZQ521 (mobile)
- Zebra ZQ630 (mobile)
Any Zebra printer with a wider printhead and the same resolution works too.
The code is written for 203 dpi: on a printer with a different resolution the label prints larger or smaller and needs rescaling.
How to use it
- Open “Customize placeholders” and enter your data in the variable fields listed above.
- Check the preview: it is rendered from the same ZPL code you will send to the printer.
- Download the .zpl file or copy the code and send it to the printer: with “Print” through Zebra Browser Print, or as a raw file to port 9100 if the printer is on the network.
- Load 100×100 mm labels and make sure the printer is set to 203 dpi. For a different size use “Duplicate & edit” and adapt the layout in the builder.
Edit it in the editor
To change the layout, use “Duplicate & edit”: the template opens in the online ZPL editor, where you modify it and save it to your account for free.
Related templates
- Lockout/Tagout tag — 70×100 mm 203 dpi · Identification · Safety
- Parking permit — 100×60 mm 203 dpi · Identification · Badge
- VIP / backstage pass (QR) — 100×70 mm 300 dpi · Identification · Badge
- Tamper-evident security seal — 80×20 mm 203 dpi · Identification · Safety
- Contractor badge — 54×86 mm CR80 300 dpi · Identification · Badge
- Document confidentiality label — 70×40 mm 203 dpi · Identification · Documents
- Membership card — 86×54 mm CR80 300 dpi · Identification · Badge
- Evidence chain of custody — 100×50 mm 203 dpi · Identification · Documents