Blood bag label — 60×50 mm
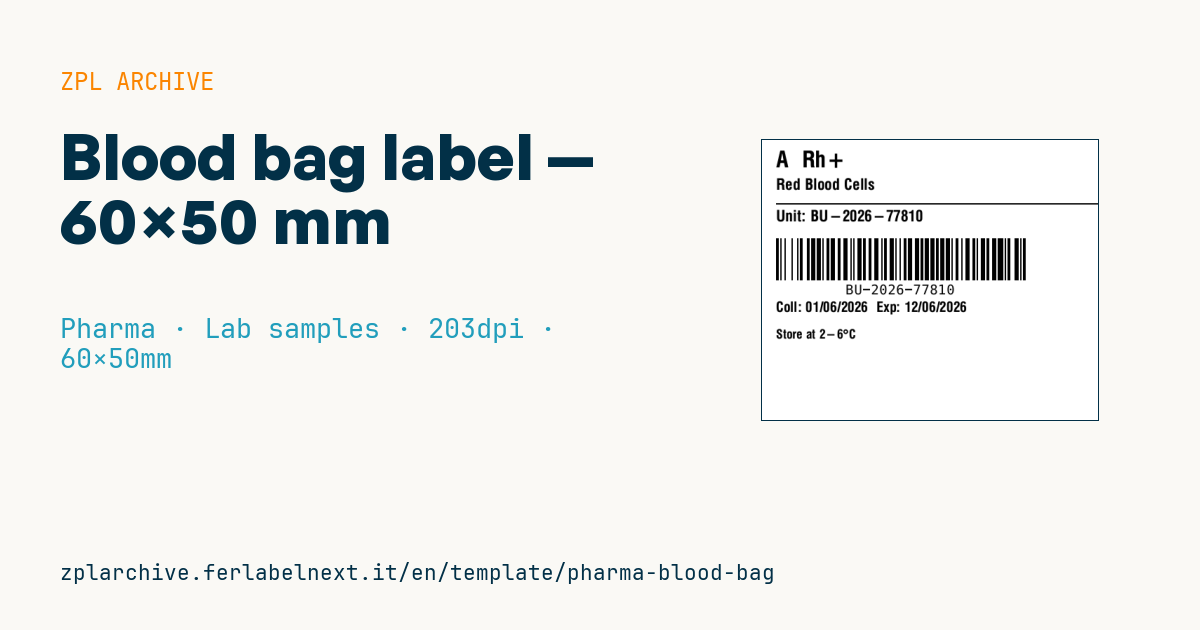
Label for a blood component bag: blood group and Rh factor highlighted, component, unit ID with a Code 128 barcode, collection/expiry dates and storage.
Blood bag label
60×50 mm @ 203 dpi. Group + Rh highlighted, component, unit ID + Code 128 barcode, collection/expiry dates and storage.
Placeholders
blood_group/rh— group (e.g.A) and factor (e.g.Rh+)component— component (e.g.Red Blood Cells)unit_id— unit IDcollection_date/expiry— datesstorage— storage
When to use it
Blood establishments and hospital transfusion services use this label to identify a single blood component unit after processing: red cells, plasma or platelets. It goes on a plasticised PVC bag and has to stay readable through centrifugation, refrigerated storage, plasma freezing and thawing in a water bath. That rules out direct thermal paper: print it thermal transfer with a resin ribbon on a synthetic face stock with an adhesive approved for blood bags.
The compact size suits internal work labels, supplementary labels or layout trials. Blood group and Rh factor must be readable at a glance by the person checking the unit at the bedside.
Standards and requirements
The international standard for blood component labelling is ISBT 128, maintained by ICCBBA. It defines data structures, data identifiers and the base label layout. This template uses plain Code 128, so treat it as a layout example rather than a certified ISBT 128 label. In the EU, quality and safety of blood are governed by Directive 2002/98/EC and national implementing rules; your blood establishment defines the mandatory content.
In ZPL, set the Code 128 module with ^BY and keep a quiet zone of at least 10 modules on both sides of the symbol.
Common mistakes
- Using direct thermal paper: cold, moisture and handling fade the blood group.
- Using an adhesive not validated for PVC, which can lift or migrate through the plastic.
- Printing a unit ID in the barcode that differs from the human-readable text because fields come from different sources.
- Printing group and Rh too small or in a low-contrast reverse field.
FAQ
Can this label replace an ISBT 128 label?
Not if your facility is bound to ISBT 128. Use it as a layout starting point; data encoding must follow the ICCBBA specifications.
Which material survives plasma freezing?
A synthetic label with a low-temperature adhesive, printed with a resin ribbon. Check the material data sheet for the minimum service temperature.
ZPL code
^XA
^PW480
^LL400
^CI28
^CF0,32^FO20,15^FD{{blood_group}}  {{rh}}^FS
^CF0,22^FO20,55^FD{{component}}^FS
^FO20,90^GB460,2,2^FS
^CF0,22^FO20,100^FDUnit: {{unit_id}}^FS
^BY2,2,60
^FO20,140^BCN,60,Y,N,N^FD{{unit_id}}^FS
^CF0,20^FO20,230^FDColl: {{collection_date}}  Exp: {{expiry}}^FS
^CF0,18^FO20,270^FD{{storage}}^FS
^XZ- Industry: Pharma
- Category: Lab samples
- DPI: 203
- Size: 60×50 mm
- Tags: Blood, Code 128, Patient, Pharma, Traceability
What this label contains
Barcodes
- Code 128
- High-density linear barcode that encodes the full ASCII set: ideal for tracking numbers, internal codes and alphanumeric IDs.
Elements
- 5 text fields
- 7 variable fields to fill in
- boxes and separator lines
Variable fields
| Field | Description | Example |
|---|---|---|
blood_group | Group | A |
rh | Rh factor | Rh+ |
component | Component | Red Blood Cells |
unit_id | Unit ID | BU-2026-77810 |
collection_date | Collection date | 01/06/2026 |
expiry | Expiry | 12/06/2026 |
storage | Storage | Store at 2-6°C |
Format and printing
60×50 mm (2.36×1.97″) at 203 dpi: 480×400 dots. Landscape.
Compatible Zebra printers
You need a printer with a 4″ printhead at 203 dpi, for example:
- Zebra ZD421 (desktop)
- Zebra ZD621 (desktop)
- Zebra GK420 (desktop)
- Zebra ZT231 (industrial)
- Zebra ZT411 (industrial)
- Zebra ZT610 (industrial)
- Zebra ZQ521 (mobile)
- Zebra ZQ630 (mobile)
Any Zebra printer with a wider printhead and the same resolution works too.
The code is written for 203 dpi: on a printer with a different resolution the label prints larger or smaller and needs rescaling.
How to use it
- Open “Customize placeholders” and enter your data in the variable fields listed above.
- Check the preview: it is rendered from the same ZPL code you will send to the printer.
- Download the .zpl file or copy the code and send it to the printer: with “Print” through Zebra Browser Print, or as a raw file to port 9100 if the printer is on the network.
- Load 60×50 mm labels and make sure the printer is set to 203 dpi. For a different size use “Duplicate & edit” and adapt the layout in the builder.
Edit it in the editor
To change the layout, use “Duplicate & edit”: the template opens in the online ZPL editor, where you modify it and save it to your account for free.
Related templates
- GS1 DataMatrix pharma — 25×10 mm (600 dpi) 600 dpi · Pharma · GS1 DataMatrix
- Patient check-in & appointment ticket — 80×150 mm 203 dpi · Pharma · Patient check-in & flow
- GS1 serialization DataMatrix — 40×25 mm 300 dpi · Pharma · GS1 DataMatrix
- UDI medical device — 50×30 mm 300 dpi · Pharma · Drug packaging
- Sample tube Aztec — 25×25 mm 300 dpi · Pharma · Lab samples
- Lab sample — 70×40 mm 300 dpi · Pharma · Lab samples
- Sterile medical lot — 60×40 mm 300 dpi · Pharma · Drug packaging
- Patient wristband — 200×25 mm 300 dpi · Pharma · Patient wristband