Patient check-in & appointment ticket — 80×150 mm
Check-in and queue ticket for clinics and outpatient departments: large call number, case/booking code, service description over 3 lines, appointment time, department/desk and facility name. Built for 80 mm thermal receipt rolls.
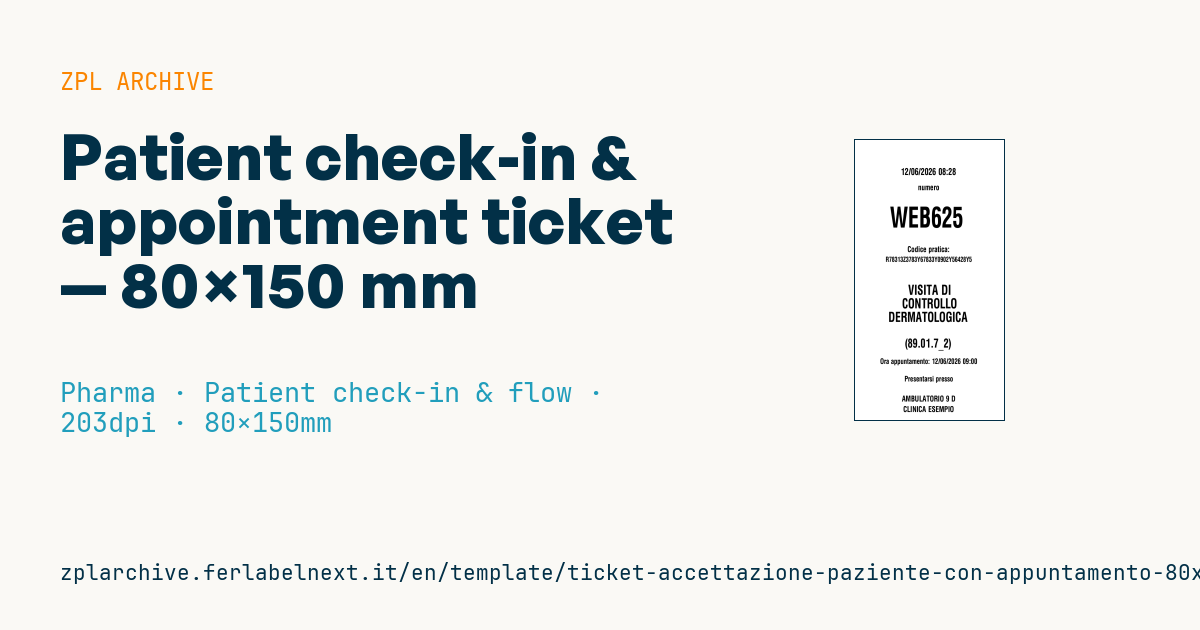
Patient check-in & appointment ticket
80×150 mm @ 203 dpi, designed for the 80 mm thermal receipt printers at the entrance of clinics and outpatient departments. All text is centred (^FB640,…,C): the call number stands out in the middle below the print date/time, while the appointment details (case code, service, time, department and facility) flow underneath.
The service description (service_description) can wrap to 3 lines: separate the lines with \& in the ZPL (e.g. FOLLOW-UP\&DERMATOLOGY\&VISIT).
The fixed labels ("numero", "Codice pratica:", "Ora appuntamento:", "Presentarsi presso") are in Italian and are part of the template: edit them directly in the ZPL if you need another language.
Placeholders
print_datetime— ticket print date and timeticket_number— call number / ticket codecase_number— case, booking or admission codeservice_description— service description (up to 3 lines, separated by\&)service_code— internal / service / tariff codeappointment_datetime— appointment date and timedepartment_or_room— department, clinic, room or deskclinic_name— name of the clinic or facility
When to use it
This ticket comes out of the kiosk or reception desk of outpatient clinics, blood-draw centres and imaging departments when a patient arrives for a booked appointment. The patient keeps it until called: the large number must be easy to match against the waiting-room display, and the lines below tell them where to go and when.
It prints on 80 mm direct thermal receipt rolls, no ribbon. It only has to last a few hours, so direct thermal is fine, but print darkness matters: elderly patients need to read it.
Standards and requirements
There is no specific standard for queue tickets: the requirements are practical (readability at a distance, order of information, clean cut). Two general rules still apply. The GDPR, Regulation (EU) 2016/679: print only what the process needs, never the patient's name or diagnosis, because tickets are often left on chairs. And the paper: in the EU, Regulation (EU) 2016/2235 restricts bisphenol A in thermal paper, so use BPA-free rolls.
On the ZPL side, check ^PW against the printer's actual printable width (often less than 80 mm) and use ^CI28 so accented characters print correctly.
Common mistakes
- Putting sensitive clinical details in the service description instead of a generic wording.
- Keeping a fixed
^LLon continuous rolls without configuring the cutter, so tickets come out joined or cut in half. - Using a call number format that differs from the waiting-room display.
- Printing the appointment date in an ambiguous format.
FAQ
Can I print this ticket on a regular label printer?
Yes, if it takes 80 mm rolls, but a kiosk is better served by a receipt printer with an auto-cutter. On adhesive stock the ticket becomes a label, which only makes sense if it goes on a form.
Why is the text cut off at the edges?
Almost always ^PW is wider than the printhead's printable area. Reduce it and re-centre the ^FB blocks.
ZPL code
^XA
^PW639
^LL1199
^LH0,0
^CI28

^FO0,120
^A0N,40,34
^FB640,1,0,C,0
^FD{{print_datetime}}^FS

^FO0,190
^A0N,34,30
^FB640,1,0,C,0
^FDnumero^FS

^FO0,285
^A0N,120,95
^FB640,1,0,C,0
^FD{{ticket_number}}^FS

^FO0,455
^A0N,34,30
^FB640,1,0,C,0
^FDCodice pratica:^FS

^FO0,500
^A0N,30,25
^FB640,1,0,C,0
^FD{{case_number}}^FS

^FO0,620
^A0N,58,48
^FB640,3,0,C,0
^FD{{service_description}}^FS

^FO0,850
^A0N,52,44
^FB640,1,0,C,0
^FD{{service_code}}^FS

^FO0,935
^A0N,32,28
^FB640,1,0,C,0
^FDOra appuntamento: {{appointment_datetime}}^FS

^FO0,1010
^A0N,32,28
^FB640,1,0,C,0
^FDPresentarsi presso^FS

^FO0,1095
^A0N,34,30
^FB640,1,0,C,0
^FD{{department_or_room}}^FS

^FO0,1140
^A0N,34,30
^FB640,1,0,C,0
^FD{{clinic_name}}^FS

^XZ- Industry: Pharma
- Category: Patient check-in & flow
- DPI: 203
- Size: 80×150 mm
- Tags: Appointment, Clinic, Patient, Queue, Ticket
What this label contains
Barcodes
This label contains no barcodes: it is made of text and graphics.
Elements
- 11 text fields
- 8 variable fields to fill in
Variable fields
| Field | Description | Example |
|---|---|---|
print_datetime | Print date/time | 12/06/2026 08:28 |
ticket_number | Call number | WEB625 |
case_number | Case code | R78313Z3783Y67833Y0902Y56428Y5 |
service_description | Service | VISITA DI\&CONTROLLO\&DERMATOLOGICA |
service_code | Service code | (89.01.7_2) |
appointment_datetime | Appointment time | 12/06/2026 09:00 |
department_or_room | Department/desk | AMBULATORIO 9 D |
clinic_name | Facility | CLINICA ESEMPIO |
Format and printing
80×150 mm (3.15×5.91″) at 203 dpi: 639×1199 dots. Portrait.
Compatible Zebra printers
You need a printer with a 4″ printhead at 203 dpi, for example:
- Zebra ZD421 (desktop)
- Zebra ZD621 (desktop)
- Zebra GK420 (desktop)
- Zebra ZT231 (industrial)
- Zebra ZT411 (industrial)
- Zebra ZT610 (industrial)
- Zebra ZQ521 (mobile)
- Zebra ZQ630 (mobile)
Any Zebra printer with a wider printhead and the same resolution works too.
The code is written for 203 dpi: on a printer with a different resolution the label prints larger or smaller and needs rescaling.
How to use it
- Open “Customize placeholders” and enter your data in the variable fields listed above.
- Check the preview: it is rendered from the same ZPL code you will send to the printer.
- Download the .zpl file or copy the code and send it to the printer: with “Print” through Zebra Browser Print, or as a raw file to port 9100 if the printer is on the network.
- Load 80×150 mm labels and make sure the printer is set to 203 dpi. For a different size use “Duplicate & edit” and adapt the layout in the builder.
Edit it in the editor
To change the layout, use “Duplicate & edit”: the template opens in the online ZPL editor, where you modify it and save it to your account for free.
Related templates
- GS1 DataMatrix pharma — 25×10 mm (600 dpi) 600 dpi · Pharma · GS1 DataMatrix
- GS1 serialization DataMatrix — 40×25 mm 300 dpi · Pharma · GS1 DataMatrix
- Sample tube Aztec — 25×25 mm 300 dpi · Pharma · Lab samples
- UDI medical device — 50×30 mm 300 dpi · Pharma · Drug packaging
- Lab sample — 70×40 mm 300 dpi · Pharma · Lab samples
- Sterile medical lot — 60×40 mm 300 dpi · Pharma · Drug packaging
- Patient wristband — 200×25 mm 300 dpi · Pharma · Patient wristband
- Prescription label — 70×40 mm 203 dpi · Pharma · Drug packaging