Sterile medical lot — 60×40 mm
Sterile medical device label: device, ref code, lot, sterilization date, expiry, method.
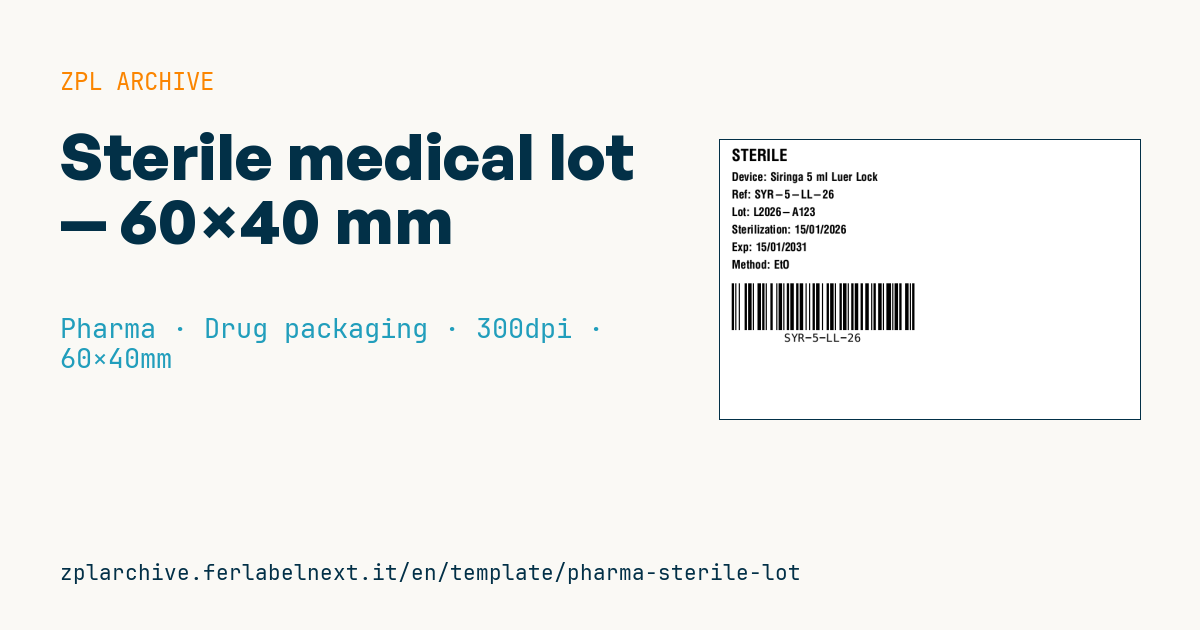
Sterile label
60×40 mm @ 300 dpi. Applied to sterilized medical device packages (syringes, surgical gloves, gauzes).
Placeholders
device_name— device nameref_code— catalog / REF codelot,expirysterilization_date—dd/mm/yyyymethod— method (EtO,Gamma,Steam)
When to use it
This label is used by anyone who packs or reprocesses terminally sterilized medical devices: single-use manufacturers, contract sterilizers and sterile services departments relabelling procedure kits. It goes on the sealed pouch or blister, so it has to bond to medical-grade paper, Tyvek or plastic film without compromising the sterile barrier.
It must survive shipping and storage for the whole claimed shelf life, often several years. Print it with thermal transfer, using a resin or wax-resin ribbon on a synthetic face stock, not on direct thermal paper.
Standards and requirements
Regulation (EU) 2017/745 (MDR), Annex I, Chapter III sets the information required on the label, including lot, expiry date and an indication of the sterile state together with the sterilization method. Symbols come from ISO 15223-1 (for example STERILE EO, STERILE R, STERILE for steam or dry heat). Process validation follows ISO 11135 (ethylene oxide), ISO 11137 (radiation) and ISO 17665 (moist heat); packaging follows ISO 11607.
The Code 128 in this layout is not a UDI carrier. If the device needs a UDI, use GS1-128 or GS1 DataMatrix with AIs (01), (17), (10). In ^BC, the sequence >;>8 starts subset C with a leading FNC1.
Common mistakes
- Writing the method as free text instead of using the correct ISO 15223-1 symbol.
- Using
dd/mm/yyyyon exported products: the ISO 8601 formatYYYY-MM-DDremoves ambiguity. - Applying a label that has not been validated for EtO or gamma before the cycle: adhesive and print can degrade.
FAQ
Does the sterilization method always have to be shown?
Yes. For devices supplied sterile, the MDR requires the sterile state and the method to be indicated, normally with the matching ISO 15223-1 symbol.
Can I print the sterilization date instead of the expiry date?
No. The expiry date is the mandatory information for the user; the sterilization date is extra data that helps internal traceability.
ZPL code
^XA
^PW709
^LL472
^CI28
^CF0,28^FO20,15^FDSTERILE^FS
^CF0,20
^FO20,55^FDDevice: {{device_name}}^FS
^FO20,85^FDRef: {{ref_code}}^FS
^FO20,115^FDLot: {{lot}}^FS
^FO20,145^FDSterilization: {{sterilization_date}}^FS
^FO20,175^FDExp: {{expiry}}^FS
^FO20,205^FDMethod: {{method}}^FS
^BY2,2,80
^FO20,245^BCN,80,Y,N,N^FD{{ref_code}}^FS
^XZ- Industry: Pharma
- Category: Drug packaging
- DPI: 300
- Size: 60×40 mm
- Tags: Code 128, Expiry, Lot
What this label contains
Barcodes
- Code 128
- High-density linear barcode that encodes the full ASCII set: ideal for tracking numbers, internal codes and alphanumeric IDs.
Elements
- 7 text fields
- 6 variable fields to fill in
Variable fields
| Field | Description | Example |
|---|---|---|
device_name | Device | Siringa 5 ml Luer Lock |
ref_code | REF | SYR-5-LL-26 |
lot | Lot | L2026-A123 |
sterilization_date | Steril. date | 15/01/2026 |
expiry | Expiry | 15/01/2031 |
method | Method | EtO |
Format and printing
60×40 mm (2.36×1.57″) at 300 dpi: 709×472 dots. Landscape.
Compatible Zebra printers
You need a printer with a 4″ printhead at 300 dpi, for example:
- Zebra ZD421 (desktop)
- Zebra ZD621 (desktop)
- Zebra ZT231 (industrial)
- Zebra ZT411 (industrial)
- Zebra ZT610 (industrial)
Any Zebra printer with a wider printhead and the same resolution works too.
The code is written for 300 dpi: on a printer with a different resolution the label prints larger or smaller and needs rescaling.
How to use it
- Open “Customize placeholders” and enter your data in the variable fields listed above.
- Check the preview: it is rendered from the same ZPL code you will send to the printer.
- Download the .zpl file or copy the code and send it to the printer: with “Print” through Zebra Browser Print, or as a raw file to port 9100 if the printer is on the network.
- Load 60×40 mm labels and make sure the printer is set to 300 dpi. For a different size use “Duplicate & edit” and adapt the layout in the builder.
Edit it in the editor
To change the layout, use “Duplicate & edit”: the template opens in the online ZPL editor, where you modify it and save it to your account for free.
Related templates
- GS1 DataMatrix pharma — 25×10 mm (600 dpi) 600 dpi · Pharma · GS1 DataMatrix
- Patient check-in & appointment ticket — 80×150 mm 203 dpi · Pharma · Patient check-in & flow
- Sample tube Aztec — 25×25 mm 300 dpi · Pharma · Lab samples
- UDI medical device — 50×30 mm 300 dpi · Pharma · Drug packaging
- GS1 serialization DataMatrix — 40×25 mm 300 dpi · Pharma · GS1 DataMatrix
- Lab sample — 70×40 mm 300 dpi · Pharma · Lab samples
- Prescription label — 70×40 mm 203 dpi · Pharma · Drug packaging
- Patient wristband — 200×25 mm 300 dpi · Pharma · Patient wristband