UDI medical device — 50×30 mm
UDI (Unique Device Identification) label for medical devices with a GS1 DataMatrix: DI, production date, serial and REF code. EU MDR compliant.
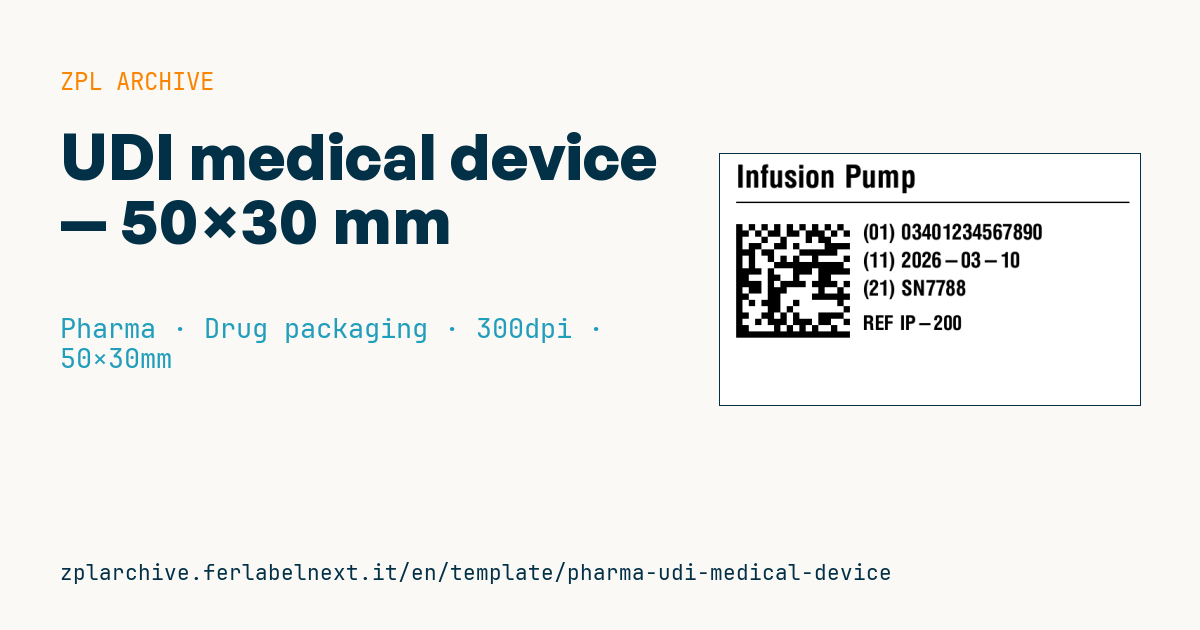
UDI medical device
50×30 mm @ 300 dpi. Device name, separator, UDI GS1 DataMatrix and readable data: DI (01), production date (11), serial (21), REF.
Placeholders
device_name— device nameudi_data— full UDI stringdi— Device Identifier (GTIN)prod_date/serial/ref— production date, serial, REF code
When to use it
Medical device manufacturers and their contract packers use this label to apply the UDI carrier to the pack or, when space allows, to the device itself. The 50×30 mm size suits instrument boxes, non-active implants and lab consumables.
Packs travel through warehouses, climate-controlled cabinets and sometimes fridges, so use thermal transfer with a resin ribbon on a synthetic label to keep the DataMatrix readable for the product's entire life.
Standards and requirements
Article 27 of Regulation (EU) 2017/745 (MDR) defines the UDI as a UDI-DI, the static model identifier, plus a UDI-PI carrying production data such as lot, serial number, manufacturing or expiry date. With the GS1 standard the DI is the GTIN in AI (01) and the PI uses (11), (17), (10), (21). The UDI must appear in both human-readable (HRI) and AIDC form. The Basic UDI-DI is for the EUDAMED database and is not printed on the label.
In ZPL the DataMatrix is created with ^BX in ECC 200 and must start with FNC1 (GS1 mode); variable-length fields followed by other AIs must be terminated with an FNC1/GS separator. At 300 dpi a 3-dot module is about 0.25 mm; verify print quality against ISO/IEC 15415.
Common mistakes
- Encoding the AI parentheses in the DataMatrix data: they belong only in the human-readable text.
- Leaving out the separator after the serial (21) when another AI follows.
- Using a GTIN not assigned to that model, or keeping it after a change that requires a new UDI-DI.
FAQ
Is the serial number mandatory in the UDI?
It depends on the device: the UDI-PI must contain the production data the manufacturer uses to control the product, so lot, serial or both. Active implantable devices require the serial number.
Can I use a QR code instead of a DataMatrix?
QR codes with GS1 syntax exist, but for healthcare UDI GS1 DataMatrix and GS1-128 are the established choices and the most compatible with hospital scanners.
ZPL code
^XA
^PW591
^LL354
^CI28
^CF0,44^FO20,15^FD{{device_name}}^FS
^FO20,68^GB560,2,2^FS
^FO20,100^BXN,9,200,,,,_^FD_1{{udi_data}}^FS
^CF0,30^FO200,100^FD(01) {{di}}^FS
^CF0,30^FO200,140^FD(11) {{prod_date}}^FS
^CF0,30^FO200,180^FD(21) {{serial}}^FS
^CF0,28^FO200,230^FDREF {{ref}}^FS
^XZ- Industry: Pharma
- Category: Drug packaging
- DPI: 300
- Size: 50×30 mm
- Tags: Compliance 2024, DataMatrix, Medical device, Pharma, UDI
What this label contains
Barcodes
- GS1 DataMatrix
- 2D code with GS1 Application Identifiers: used for pharmaceutical serialisation (GTIN, batch, expiry, serial number) and for medical device UDI.
Elements
- 5 text fields
- 6 variable fields to fill in
- boxes and separator lines
Variable fields
| Field | Description | Example |
|---|---|---|
device_name | Device | Infusion Pump |
udi_data | UDI data | 01034012345678901126031021SN7788 |
di | DI (GTIN) | 03401234567890 |
prod_date | Production date | 2026-03-10 |
serial | Serial | SN7788 |
ref | REF code | IP-200 |
Format and printing
50×30 mm (1.97×1.18″) at 300 dpi: 591×354 dots. Landscape.
Compatible Zebra printers
You need a printer with a 2″ printhead at 300 dpi, for example:
- Zebra ZD411 (desktop)
- Zebra ZD611 (desktop)
Any Zebra printer with a wider printhead and the same resolution works too.
The code is written for 300 dpi: on a printer with a different resolution the label prints larger or smaller and needs rescaling.
How to use it
- Open “Customize placeholders” and enter your data in the variable fields listed above.
- Check the preview: it is rendered from the same ZPL code you will send to the printer.
- Download the .zpl file or copy the code and send it to the printer: with “Print” through Zebra Browser Print, or as a raw file to port 9100 if the printer is on the network.
- Load 50×30 mm labels and make sure the printer is set to 300 dpi. For a different size use “Duplicate & edit” and adapt the layout in the builder.
Edit it in the editor
To change the layout, use “Duplicate & edit”: the template opens in the online ZPL editor, where you modify it and save it to your account for free.
Related templates
- GS1 DataMatrix pharma — 25×10 mm (600 dpi) 600 dpi · Pharma · GS1 DataMatrix
- Patient check-in & appointment ticket — 80×150 mm 203 dpi · Pharma · Patient check-in & flow
- Sample tube Aztec — 25×25 mm 300 dpi · Pharma · Lab samples
- GS1 serialization DataMatrix — 40×25 mm 300 dpi · Pharma · GS1 DataMatrix
- Lab sample — 70×40 mm 300 dpi · Pharma · Lab samples
- Sterile medical lot — 60×40 mm 300 dpi · Pharma · Drug packaging
- Prescription label — 70×40 mm 203 dpi · Pharma · Drug packaging
- Patient wristband — 200×25 mm 300 dpi · Pharma · Patient wristband