Lab sample — 70×40 mm
Test tube label for analysis lab: patient, test, collection time, operator, sample ID with barcode.
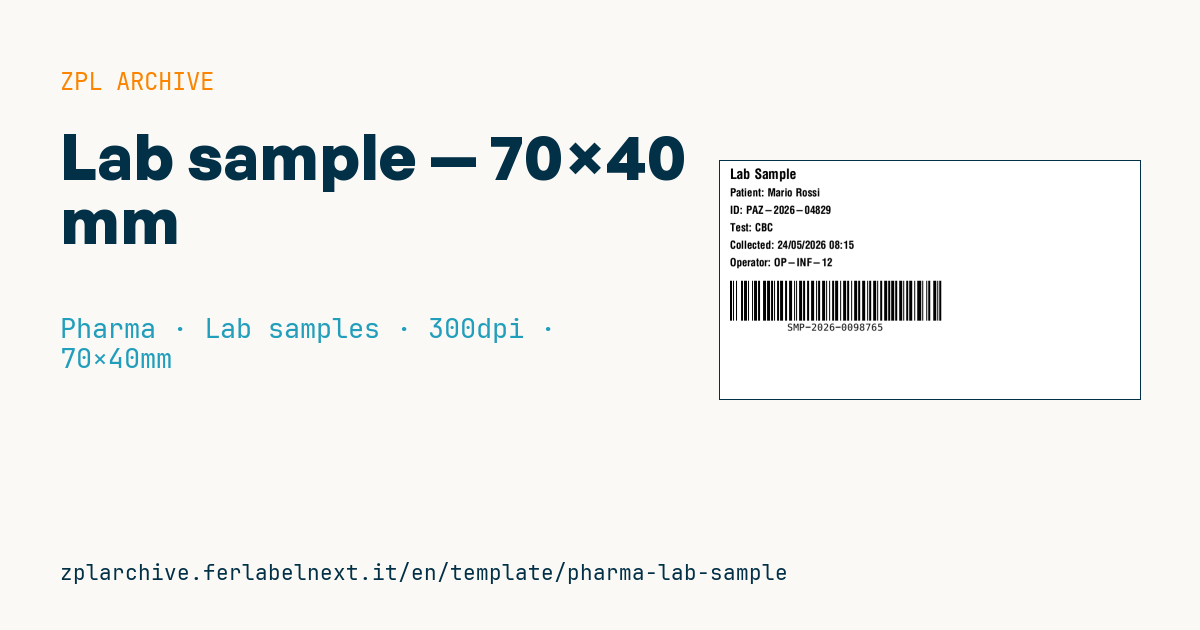
Lab sample
70×40 mm @ 300 dpi. Applied to the test tube after collection; barcode is scanned during analysis to link result to patient.
Placeholders
patient_name,patient_idtest_code— test code (e.g.CBC,HBA1C)collected_at—dd/mm/yyyy HH:MMoperator— collection operatorsample_id— unique sample id (barcode)
When to use it
The specimen label is printed at the collection point, on the ward or at lab reception, right before or after collection, and applied to the container in front of the patient. The 70×40 mm size suits containers larger than a standard tube: urine containers, blood culture bottles, tube racks or transport bags. On narrow tubes it must wrap lengthwise, leaving a window to see the sample.
The stock must cope with fridge, centrifuge and sometimes freezer: for long storage use thermal transfer on synthetic material with a low-temperature adhesive.
Standards and requirements
ISO 15189 for medical laboratories requires unique identification and traceability of each specimen; CLSI AUTO12 gives guidance on content, placement and orientation of tube labels for automated analysers. Patient safety practice calls for at least two identifiers (for example name plus ID or date of birth). Health data are personal data, so GDPR also covers what you print.
Orient the Code 128 parallel to the tube axis ("ladder") if the analyser's reader requires it, and set the module with ^BY to suit that reader.
Common mistakes
- Printing labels in advance for several patients and mixing them up at collection.
- Applying the label skewed or over the tube manufacturer's label, which blocks automatic reading.
- Covering the whole container so level and appearance of the sample can no longer be checked.
- Encoding an ID that differs from the one in the laboratory information system (LIS).
FAQ
Which barcode do analysers read?
Most analysers read Code 128 and other linear symbologies; 2D codes are not always supported. Check your supplier's list.
Can I reprint a specimen label?
Yes, but from the LIS with the same ID, never by creating a new specimen, and the reprint must be logged.
ZPL code
^XA
^PW827
^LL472
^CI28
^CF0,28^FO20,15^FDLab Sample^FS
^CF0,22
^FO20,55^FDPatient: {{patient_name}}^FS
^FO20,90^FDID: {{patient_id}}^FS
^FO20,125^FDTest: {{test_code}}^FS
^FO20,160^FDCollected: {{collected_at}}^FS
^FO20,195^FDOperator: {{operator}}^FS
^BY2,2,80
^FO20,240^BCN,80,Y,N,N^FD{{sample_id}}^FS
^XZ- Industry: Pharma
- Category: Lab samples
- DPI: 300
- Size: 70×40 mm
- Tags: Code 128
What this label contains
Barcodes
- Code 128
- High-density linear barcode that encodes the full ASCII set: ideal for tracking numbers, internal codes and alphanumeric IDs.
Elements
- 6 text fields
- 6 variable fields to fill in
Variable fields
| Field | Description | Example |
|---|---|---|
patient_name | Patient | Mario Rossi |
patient_id | Patient id | PAZ-2026-04829 |
test_code | Test | CBC |
collected_at | Collected | 24/05/2026 08:15 |
operator | Operator | OP-INF-12 |
sample_id | Sample id | SMP-2026-0098765 |
Format and printing
70×40 mm (2.76×1.57″) at 300 dpi: 827×472 dots. Landscape.
Compatible Zebra printers
You need a printer with a 4″ printhead at 300 dpi, for example:
- Zebra ZD421 (desktop)
- Zebra ZD621 (desktop)
- Zebra ZT231 (industrial)
- Zebra ZT411 (industrial)
- Zebra ZT610 (industrial)
Any Zebra printer with a wider printhead and the same resolution works too.
The code is written for 300 dpi: on a printer with a different resolution the label prints larger or smaller and needs rescaling.
How to use it
- Open “Customize placeholders” and enter your data in the variable fields listed above.
- Check the preview: it is rendered from the same ZPL code you will send to the printer.
- Download the .zpl file or copy the code and send it to the printer: with “Print” through Zebra Browser Print, or as a raw file to port 9100 if the printer is on the network.
- Load 70×40 mm labels and make sure the printer is set to 300 dpi. For a different size use “Duplicate & edit” and adapt the layout in the builder.
Edit it in the editor
To change the layout, use “Duplicate & edit”: the template opens in the online ZPL editor, where you modify it and save it to your account for free.
Related templates
- GS1 DataMatrix pharma — 25×10 mm (600 dpi) 600 dpi · Pharma · GS1 DataMatrix
- Patient check-in & appointment ticket — 80×150 mm 203 dpi · Pharma · Patient check-in & flow
- UDI medical device — 50×30 mm 300 dpi · Pharma · Drug packaging
- GS1 serialization DataMatrix — 40×25 mm 300 dpi · Pharma · GS1 DataMatrix
- Sample tube Aztec — 25×25 mm 300 dpi · Pharma · Lab samples
- Prescription label — 70×40 mm 203 dpi · Pharma · Drug packaging
- Patient wristband — 200×25 mm 300 dpi · Pharma · Patient wristband
- Sterile medical lot — 60×40 mm 300 dpi · Pharma · Drug packaging