Component reel label — 60×40 mm
Label for SMD/electronic component reels: part number, description, quantity, lot and a Code 128 barcode. For the electronics manufacturing warehouse.
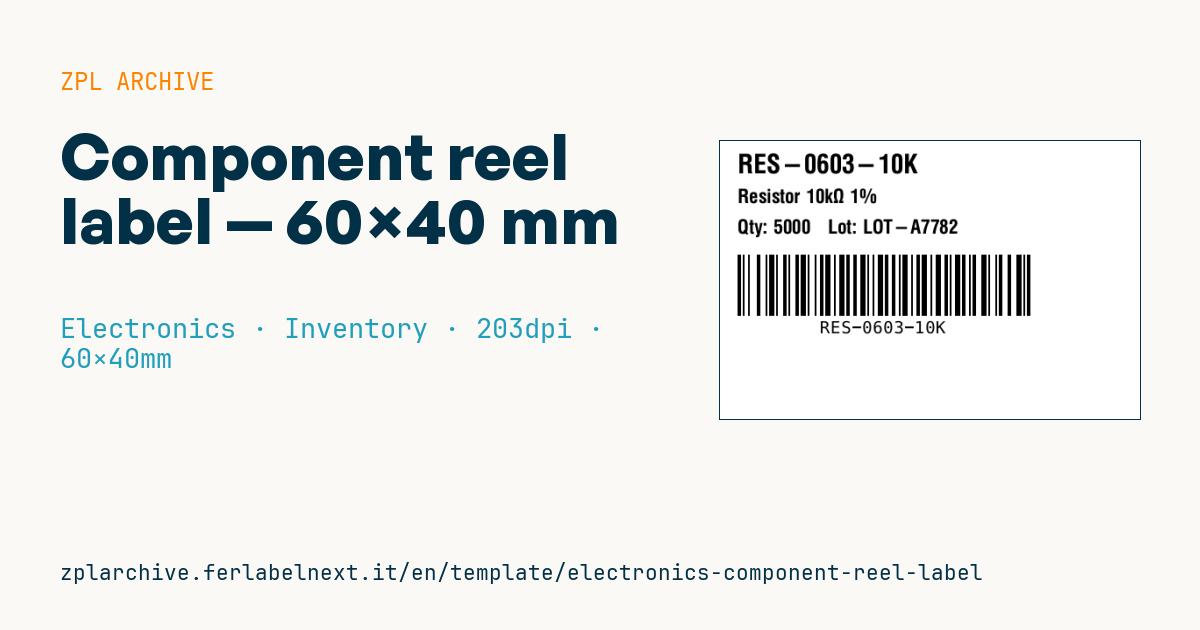
Component reel label
60×40 mm @ 203 dpi. Part number prominent, description, quantity and lot on the same line, a Code 128 barcode with the part number.
Placeholders
part_number— component code (P/N)description— component descriptionquantity— quantity on the reellot— lot number
When to use it
It is used at goods-in and in the electronics manufacturing (EMS) stores to identify reels, sticks and trays of SMD components before they are loaded onto pick-and-place feeders. The operator scans the part number to confirm the right reel goes into the right slot: a component swap is often only discovered at test, when the boards are already soldered.
The label goes on the side of the reel, on coated paper or polypropylene in thermal transfer. Reels move through dry cabinets and baking ovens: if your bake cycle runs hot, choose a material rated for it.
Standards and requirements
For tape and reel packaging the reference is EIA-481. Many customers require barcodes with ANSI MH10.8.2 Data Identifiers, for example P (customer part number), 1P (supplier part number), Q (quantity) and 1T (lot): if your customer asks for them, the prefix belongs inside the barcode data. Moisture-sensitive devices are handled per IPC/JEDEC J-STD-033, with an MSL label separate from this one.
In ZPL, for a long Code 128 at 203 dpi check with ^BY that the module stays readable and the side quiet zones do not fall off the label.
Common mistakes
- Not reprinting the label when a partly used reel returns to stock with a different quantity.
- Encoding the description or spaces in the barcode instead of just the part number.
- Using the manufacturer part number where the MES expects the internal one, or the other way round.
- Covering the manufacturer's original label, which carries the date code and factory lot.
FAQ
What are Data Identifiers on component labels?
They are standard prefixes (such as P, Q, 1T) that tell the scanner what the following data means. They matter when several codes are read in sequence.
Is a Code 128 enough, or do I need a DataMatrix?
A Code 128 with the part number works for feeder verification. If you want part number, quantity and lot in one scan, a 2D code is more compact.
ZPL code
^XA
^PW480
^LL320
^CI28
^CF0,30^FO20,15^FD{{part_number}}^FS
^CF0,22^FO20,55^FD{{description}}^FS
^CF0,22^FO20,90^FDQty: {{quantity}}   Lot: {{lot}}^FS
^BY2,2,70
^FO20,130^BCN,70,Y,N,N^FD{{part_number}}^FS
^XZ- Industry: Electronics
- Category: Inventory
- DPI: 203
- Size: 60×40 mm
- Tags: Code 128, Electronics, Serial number, Specifications
What this label contains
Barcodes
- Code 128
- High-density linear barcode that encodes the full ASCII set: ideal for tracking numbers, internal codes and alphanumeric IDs.
Elements
- 3 text fields
- 4 variable fields to fill in
Variable fields
| Field | Description | Example |
|---|---|---|
part_number | Part number | RES-0603-10K |
description | Description | Resistor 10kΩ 1% |
quantity | Quantity | 5000 |
lot | Lot | LOT-A7782 |
Format and printing
60×40 mm (2.36×1.57″) at 203 dpi: 480×320 dots. Landscape.
Compatible Zebra printers
You need a printer with a 4″ printhead at 203 dpi, for example:
- Zebra ZD421 (desktop)
- Zebra ZD621 (desktop)
- Zebra GK420 (desktop)
- Zebra ZT231 (industrial)
- Zebra ZT411 (industrial)
- Zebra ZT610 (industrial)
- Zebra ZQ521 (mobile)
- Zebra ZQ630 (mobile)
Any Zebra printer with a wider printhead and the same resolution works too.
The code is written for 203 dpi: on a printer with a different resolution the label prints larger or smaller and needs rescaling.
How to use it
- Open “Customize placeholders” and enter your data in the variable fields listed above.
- Check the preview: it is rendered from the same ZPL code you will send to the printer.
- Download the .zpl file or copy the code and send it to the printer: with “Print” through Zebra Browser Print, or as a raw file to port 9100 if the printer is on the network.
- Load 60×40 mm labels and make sure the printer is set to 203 dpi. For a different size use “Duplicate & edit” and adapt the layout in the builder.
Edit it in the editor
To change the layout, use “Duplicate & edit”: the template opens in the online ZPL editor, where you modify it and save it to your account for free.
Related templates
- Instrument calibration tag (QR) — 40×30 mm 600 dpi · Electronics · Asset
- Cable/connector label (flag wrap) — 50×25 mm 300 dpi · Electronics · Commercial label
- ESD / voltage warning label — 50×30 mm 203 dpi · Electronics · Commercial label
- Battery rating label — 50×30 mm 203 dpi · Electronics · Commercial label
- DataMatrix PCB label — 25×25 mm 300 dpi · Electronics · Traceability
- Device manual/support QR — 40×40 mm 300 dpi · Electronics · Commercial label
- RMA return tag — 70×50 mm 203 dpi · Electronics · Return
- IT asset tag with QR — 50×25 mm 300 dpi · Electronics · Asset