Kanban card — 100×70 mm
Kanban card for just-in-time replenishment: part, description, quantity, bin, supplier/consumer location and barcode. For the production pull system.
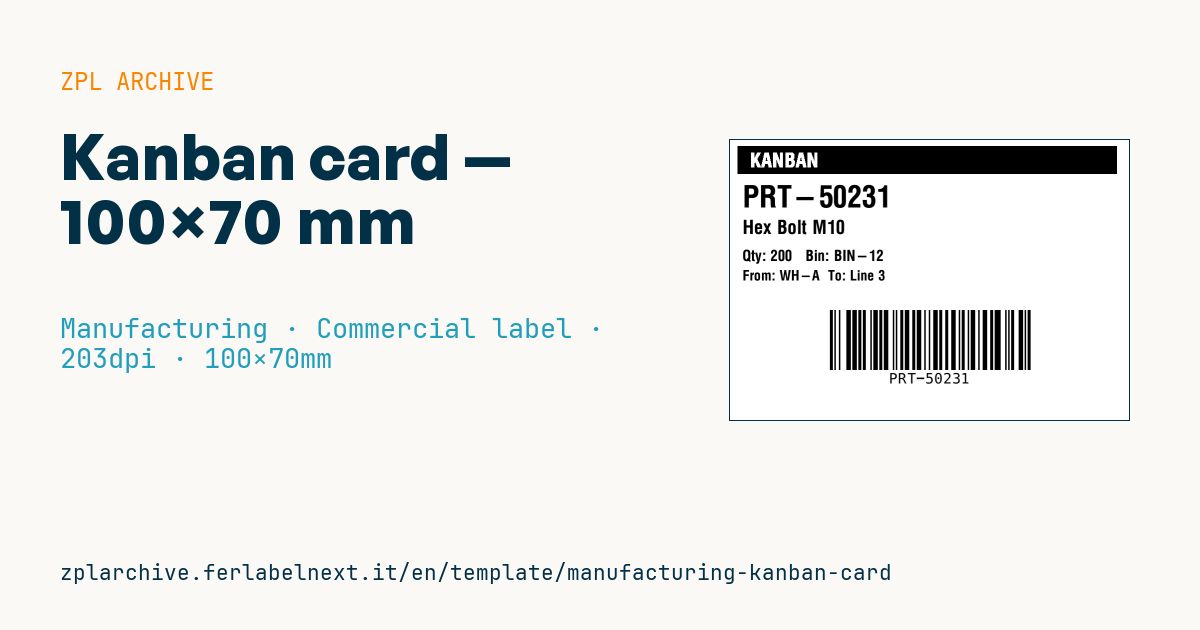
Kanban card
100×70 mm @ 203 dpi. Contrast title band, large part, description, quantity+bin, supplier/consumer location and a Code 128 barcode.
Placeholders
title_label— title (e.g.KANBAN)part_number/description— part and descriptionquantity/bin— quantity and binsupplier_loc/consumer_loc— locations
When to use it
The card travels with a container in a pull replenishment loop: when the line empties the container, the card goes back to the supermarket or internal supplier and authorises picking or producing a fixed quantity. Material handlers, milk-run operators and supervisors use it, and it is often scanned to raise an e-kanban in the ERP.
A card makes dozens of trips between departments, oily hands and card holders: print it by thermal transfer on synthetic stock or put it in a protective sleeve. Direct thermal paper fades and becomes unreadable within weeks.
Standards and requirements
There is no specific standard for kanban cards: they are a Toyota Production System and lean tool governed by internal rules. The practical requirements are a fixed container quantity matching the item master, unique source and destination locations, and a barcode that reads from a distance.
At 203 dpi one dot is 0.125 mm, so ^BY3 gives a 0.375 mm module, easy for handheld scanners reading through a sleeve. Set ^PW800 and ^LL560 to use the whole format.
Common mistakes
- Encoding only the part number: if you need to count the cards in a loop, add a card number to the barcode data.
- Changing the container quantity in the ERP without reprinting the cards in circulation.
- Leaving old cards around after resizing the loop, so inventory grows unnoticed.
- Using a small font for locations that operators read while walking.
FAQ
How many kanban cards do you need for one part?
Start from average demand multiplied by replenishment lead time, add a safety factor, and divide by the container quantity. Review the number whenever demand or lead time changes.
What is the difference between a withdrawal and a production kanban?
A withdrawal kanban authorises moving material from one location to another; a production kanban authorises making it. With supplier and consumer locations, this layout works for both.
ZPL code
^XA
^PW799
^LL559
^CI28
^FO15,12^GB760,56,56^FS
^FR^CF0,40^FO40,25^FD{{title_label}}^FS
^CF0,60^FO25,90^FD{{part_number}}^FS
^CF0,38^FO25,160^FD{{description}}^FS
^CF0,30^FO25,220^FDQty: {{quantity}}   Bin: {{bin}}^FS
^CF0,28^FO25,260^FDFrom: {{supplier_loc}}  To: {{consumer_loc}}^FS
^BY3,2,70
^FO200,340^BCN,120,Y,N,N^FD{{part_number}}^FS
^XZ- Industry: Manufacturing
- Category: Commercial label
- DPI: 203
- Size: 100×70 mm
- Tags: Code 128, Kanban, Manufacturing, Production
What this label contains
Barcodes
- Code 128
- High-density linear barcode that encodes the full ASCII set: ideal for tracking numbers, internal codes and alphanumeric IDs.
Elements
- 5 text fields
- 7 variable fields to fill in
- boxes and separator lines
Variable fields
| Field | Description | Example |
|---|---|---|
title_label | Title | KANBAN |
part_number | Part | PRT-50231 |
description | Description | Hex Bolt M10 |
quantity | Quantity | 200 |
bin | Bin | BIN-12 |
supplier_loc | From | WH-A |
consumer_loc | To | Line 3 |
Format and printing
100×70 mm (3.94×2.76″) at 203 dpi: 799×559 dots. Landscape.
Compatible Zebra printers
You need a printer with a 4″ printhead at 203 dpi, for example:
- Zebra ZD421 (desktop)
- Zebra ZD621 (desktop)
- Zebra GK420 (desktop)
- Zebra ZT231 (industrial)
- Zebra ZT411 (industrial)
- Zebra ZT610 (industrial)
- Zebra ZQ521 (mobile)
- Zebra ZQ630 (mobile)
Any Zebra printer with a wider printhead and the same resolution works too.
The code is written for 203 dpi: on a printer with a different resolution the label prints larger or smaller and needs rescaling.
How to use it
- Open “Customize placeholders” and enter your data in the variable fields listed above.
- Check the preview: it is rendered from the same ZPL code you will send to the printer.
- Download the .zpl file or copy the code and send it to the printer: with “Print” through Zebra Browser Print, or as a raw file to port 9100 if the printer is on the network.
- Load 100×70 mm labels and make sure the printer is set to 203 dpi. For a different size use “Duplicate & edit” and adapt the layout in the builder.
Edit it in the editor
To change the layout, use “Duplicate & edit”: the template opens in the online ZPL editor, where you modify it and save it to your account for free.
Related templates
- Company asset tag with QR — 50×50 mm 203 dpi · Manufacturing · Asset
- Generic GS1-128 — 100×50 mm 203 dpi · Manufacturing · GS1-128
- Document control label — 60×40 mm 203 dpi · Manufacturing · Documents
- Fixed asset with QR — 50×30 mm 203 dpi · Manufacturing · Asset
- Preventive maintenance — 60×40 mm 203 dpi · Manufacturing · Asset
- Machine asset DataMatrix — 40×25 mm 300 dpi · Manufacturing · Asset
- Daily visitor pass — 100×70 mm 203 dpi · Manufacturing · Badge
- Calibration due label — 50×30 mm 203 dpi · Manufacturing · Asset