Cross-dock receiving — 100×70 mm
Cross-dock movement label: links inbound ref to outbound, shows staging area, outbound carrier and cutoff.
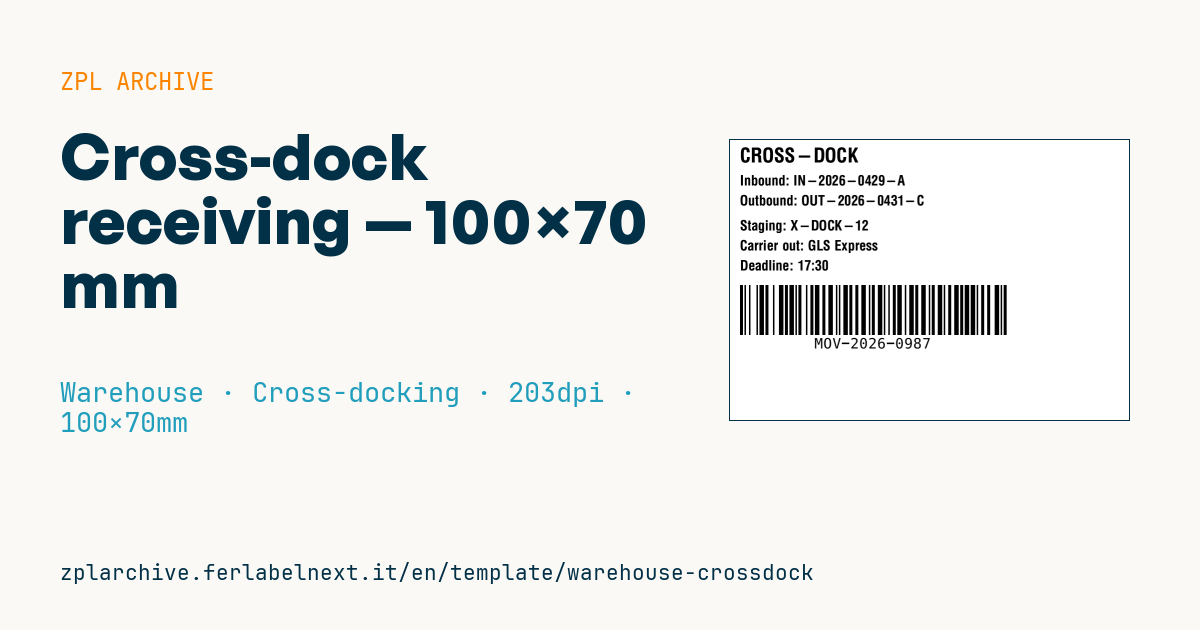
Cross-dock receiving
100×70 mm format. Applied to the package on receipt, directs the operator to the correct staging area and sets the deadline for outbound loading.
Placeholders
inbound_ref— inbound referenceoutbound_ref— outbound referencestaging_zone— temporary staging areacarrier_out— outbound carriercutoff_time— cutoff time (HH:MM)movement_id— movement id (barcode)
When to use it
In cross-docking, goods arrive at one door and leave from another within hours, without going into storage. This label is applied at receiving to the freshly unloaded carton or pallet: the forklift driver reads the staging zone and the cutoff time and takes the goods straight to the outbound door of the right carrier. Distribution hubs, retail platforms and 3PLs sorting multi-client flows use it.
The label lives for hours or a few days indoors, so direct thermal is fine. If pallets wait on an outdoor yard or in cold rooms, pick a material rated for moisture and low temperatures.
Standards and requirements
There is no specific standard for a cross-dock movement label: it is an internal document. If the carton continues to a customer or carrier working with GS1 standards, the identifier that matters is the SSCC on the logistic label, and this label must not cover it. The practical requirements are zone and time readable from a distance and a Code 128 barcode (ISO/IEC 15417) that scans from a forklift: increase the module with ^BY3 and raise the bar height.
Common mistakes
- Sticking the label over the shipper's or carrier's label, hiding the SSCC or waybill.
- Showing the cutoff time without a date when the flow runs past midnight.
- Reprinting a label with a new movement id without cancelling the previous one in the WMS.
- Printing the staging zone in small type: the operator has to read it without leaving the truck.
FAQ
Where should the cross-dock label go on the pallet?
On a side facing the handling aisle, away from existing logistic labels and at a height the forklift driver can read. Check whether your customer has placement rules.
Does this label need a GS1-128 barcode?
No, the movement id is an internal reference and goes in plain Code 128. The GS1 data stays on the original logistic label.
ZPL code
^XA
^PW799
^LL559
^CI28
^CF0,40^FO20,15^FDCROSS-DOCK^FS
^CF0,28
^FO20,70^FDInbound: {{inbound_ref}}^FS
^FO20,110^FDOutbound: {{outbound_ref}}^FS
^FO20,160^FDStaging: {{staging_zone}}^FS
^FO20,200^FDCarrier out: {{carrier_out}}^FS
^FO20,240^FDDeadline: {{cutoff_time}}^FS
^BY3,2,100
^FO20,290^BCN,100,Y,N,N^FD{{movement_id}}^FS
^XZ- Industry: Warehouse
- Category: Cross-docking
- DPI: 203
- Size: 100×70 mm
- Tags: Code 128, Tracking
What this label contains
Barcodes
- Code 128
- High-density linear barcode that encodes the full ASCII set: ideal for tracking numbers, internal codes and alphanumeric IDs.
Elements
- 6 text fields
- 6 variable fields to fill in
Variable fields
| Field | Description | Example |
|---|---|---|
inbound_ref | Inbound ref | IN-2026-0429-A |
outbound_ref | Outbound ref | OUT-2026-0431-C |
staging_zone | Staging | X-DOCK-12 |
carrier_out | Outbound carrier | GLS Express |
cutoff_time | Cutoff | 17:30 |
movement_id | Movement id | MOV-2026-0987 |
Format and printing
100×70 mm (3.94×2.76″) at 203 dpi: 799×559 dots. Landscape.
Compatible Zebra printers
You need a printer with a 4″ printhead at 203 dpi, for example:
- Zebra ZD421 (desktop)
- Zebra ZD621 (desktop)
- Zebra GK420 (desktop)
- Zebra ZT231 (industrial)
- Zebra ZT411 (industrial)
- Zebra ZT610 (industrial)
- Zebra ZQ521 (mobile)
- Zebra ZQ630 (mobile)
Any Zebra printer with a wider printhead and the same resolution works too.
The code is written for 203 dpi: on a printer with a different resolution the label prints larger or smaller and needs rescaling.
How to use it
- Open “Customize placeholders” and enter your data in the variable fields listed above.
- Check the preview: it is rendered from the same ZPL code you will send to the printer.
- Download the .zpl file or copy the code and send it to the printer: with “Print” through Zebra Browser Print, or as a raw file to port 9100 if the printer is on the network.
- Load 100×70 mm labels and make sure the printer is set to 203 dpi. For a different size use “Duplicate & edit” and adapt the layout in the builder.
Edit it in the editor
To change the layout, use “Duplicate & edit”: the template opens in the online ZPL editor, where you modify it and save it to your account for free.
Related templates
- Multi-level bay location — 100×50 mm 203 dpi · Warehouse · Location
- Single rack location — 50×30 mm 203 dpi · Warehouse · Location
- Shelf-edge / bin label — 40×20 mm 300 dpi · Warehouse · Location
- Pick face label with QR — 60×40 mm 203 dpi · Warehouse · Picking
- GS1 SSCC pallet — 100×150 mm 203 dpi · Warehouse · SSCC
- Cycle count label — 50×30 mm 203 dpi · Warehouse · Inventory
- Annual inventory serial — 60×40 mm 203 dpi · Warehouse · Inventory
- WMS tote label — 70×50 mm 203 dpi · Warehouse · Picking