WMS tote label — 70×50 mm
WMS tote label: container id, assigned operator, drop zone, linked order.
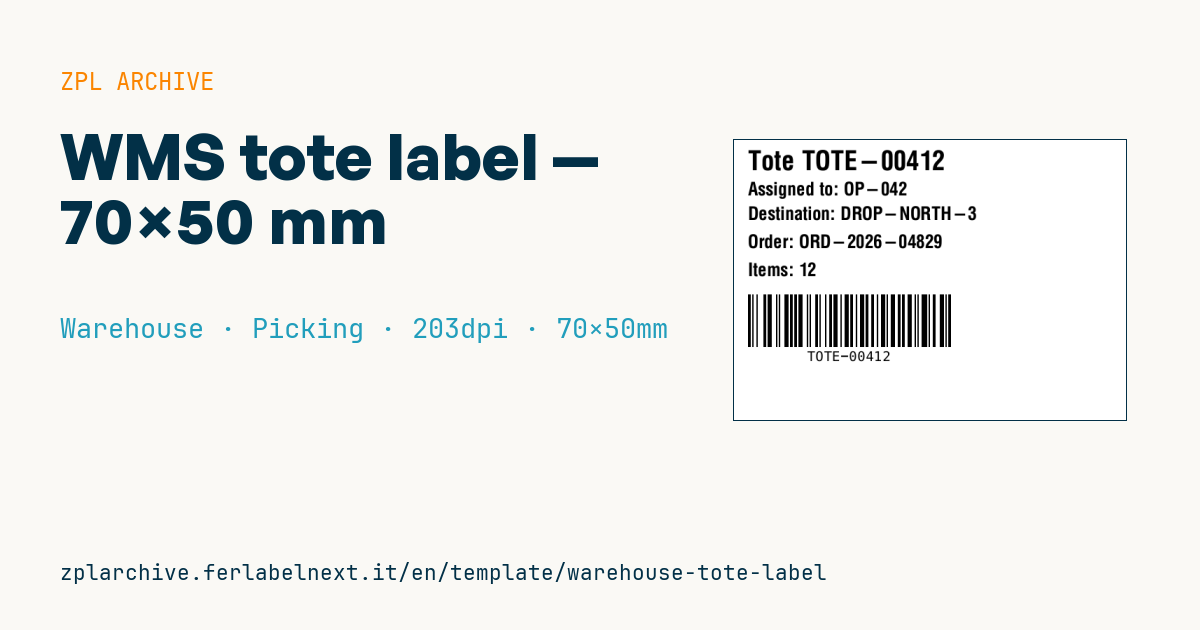
WMS tote label
70×50 mm format. Applied to the tote during picking; stays with the tote until the drop point where it's removed at consolidation.
Placeholders
tote_id— tote code (reusable)operator— pickerdrop_zone— drop zoneorder_id— destination orderitem_count— items expected in the tote
When to use it
It is printed when the WMS releases a picking task and assigns a tote to an order: the operator applies the label, picks the items, and the tote travels by hand or on a conveyor to the drop zone or consolidation station, where the label is removed and the tote goes back into circulation. Its useful life is a few hours, so direct thermal paper is the normal choice; what matters is the adhesive, which must be removable so it leaves no residue on the plastic.
Standards and requirements
There is no specific standard for tote labels: the requirements come from your WMS and from the scanners along the route. For Code 128 print quality the reference is ISO/IEC 15416. If totes pass fixed scanners, apply the label on the same side and at the same height every time, and agree the bar orientation relative to the direction of travel with whoever installed the readers. In ZPL use ^CI28 if operator names contain accented letters.
Common mistakes
- Using permanent adhesive on reusable totes: residue builds up and new labels peel off.
- Not removing the previous label: a fixed scanner may read the old code and route the tote to the wrong order.
- Printing labels for the whole shift in advance: if the WMS reassigns a task, the printed data no longer matches.
FAQ
Is a printed tote label better than a permanent code on the container?
Many warehouses use both: a permanent code identifies the tote, while the printed label adds order, zone and operator in human-readable form. It depends on how your WMS links totes to orders.
Why doesn't the conveyor scanner read the tote?
The usual causes are a label outside the read window, wrongly oriented bars or a print that is too light. Try raising darkness with ~SD or ^MD and check the label position.
ZPL code
^XA
^PW559
^LL400
^CI28
^CF0,38^FO20,15^FDTote {{tote_id}}^FS
^CF0,26
^FO20,60^FDAssigned to: {{operator}}^FS
^FO20,95^FDDestination: {{drop_zone}}^FS
^FO20,135^FDOrder: {{order_id}}^FS
^FO20,175^FDItems: {{item_count}}^FS
^BY2,2,75
^FO20,220^BCN,75,Y,N,N^FD{{tote_id}}^FS
^XZWhat this label contains
Barcodes
- Code 128
- High-density linear barcode that encodes the full ASCII set: ideal for tracking numbers, internal codes and alphanumeric IDs.
Elements
- 5 text fields
- 5 variable fields to fill in
Variable fields
| Field | Description | Example |
|---|---|---|
tote_id | Tote id | TOTE-00412 |
operator | Operator | OP-042 |
drop_zone | Drop | DROP-NORTH-3 |
order_id | Order | ORD-2026-04829 |
item_count | Items | 12 |
Format and printing
70×50 mm (2.76×1.97″) at 203 dpi: 559×400 dots. Landscape.
Compatible Zebra printers
You need a printer with a 4″ printhead at 203 dpi, for example:
- Zebra ZD421 (desktop)
- Zebra ZD621 (desktop)
- Zebra GK420 (desktop)
- Zebra ZT231 (industrial)
- Zebra ZT411 (industrial)
- Zebra ZT610 (industrial)
- Zebra ZQ521 (mobile)
- Zebra ZQ630 (mobile)
Any Zebra printer with a wider printhead and the same resolution works too.
The code is written for 203 dpi: on a printer with a different resolution the label prints larger or smaller and needs rescaling.
How to use it
- Open “Customize placeholders” and enter your data in the variable fields listed above.
- Check the preview: it is rendered from the same ZPL code you will send to the printer.
- Download the .zpl file or copy the code and send it to the printer: with “Print” through Zebra Browser Print, or as a raw file to port 9100 if the printer is on the network.
- Load 70×50 mm labels and make sure the printer is set to 203 dpi. For a different size use “Duplicate & edit” and adapt the layout in the builder.
Edit it in the editor
To change the layout, use “Duplicate & edit”: the template opens in the online ZPL editor, where you modify it and save it to your account for free.
Related templates
- Multi-level bay location — 100×50 mm 203 dpi · Warehouse · Location
- Single rack location — 50×30 mm 203 dpi · Warehouse · Location
- Shelf-edge / bin label — 40×20 mm 300 dpi · Warehouse · Location
- Cross-dock receiving — 100×70 mm 203 dpi · Warehouse · Cross-docking
- Pick face label with QR — 60×40 mm 203 dpi · Warehouse · Picking
- GS1 SSCC pallet — 100×150 mm 203 dpi · Warehouse · SSCC
- Zone / aisle sign — 100×50 mm 203 dpi · Warehouse · Location
- Quality hold label — 70×50 mm 203 dpi · Warehouse · Inventory