Goods receipt label — 100×70 mm
Warehouse goods receipt label: purchase order number, supplier, date, quantity, item code and a Code 128 barcode. For goods-in and acceptance.
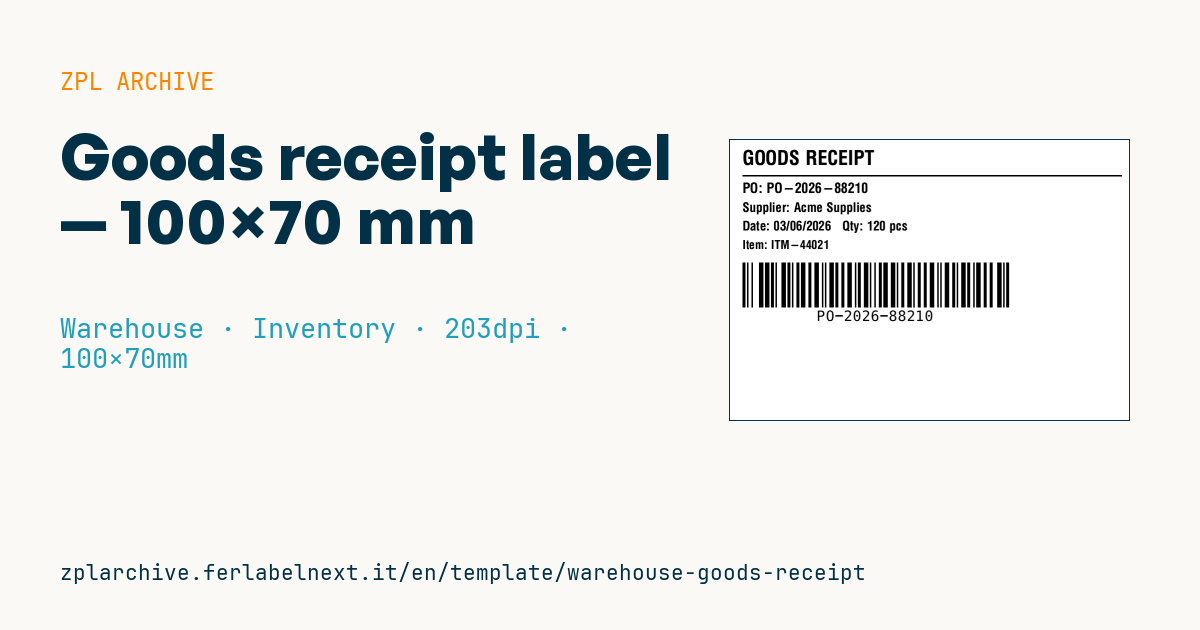
Goods receipt label
100×70 mm @ 203 dpi. Title, separator, PO, supplier, date+quantity, item code and a Code 128 barcode with the PO number.
Placeholders
title_label— title (e.g.GOODS RECEIPT)po_number— purchase order numbersupplier— supplierdate/quantity— date and quantityitem_code— item code
When to use it
The goods receipt label is printed at the receiving desk after checking the delivery note against the purchase order. It goes on the accepted carton or pallet and stays with it until putaway: whoever stores or inspects the goods scans the barcode and finds order, supplier and item in the system straight away. Production, distribution and spare-parts warehouses use it, especially when suppliers do not send standard labels the WMS can read.
If the goods stay in stock for months, use thermal transfer on coated paper or polypropylene; for a short transit, direct thermal is enough.
Standards and requirements
This is an internal Code 128 label (ISO/IEC 15417) and does not follow a GS1 specification: do not use brackets or application identifiers in the order number. If the supplier ships with a GS1 logistic label, scan the SSCC (AI 00) and, where available, use the EDI despatch advice (DESADV) to automate receiving. In the food sector, Regulation (EC) 178/2002 requires you to trace the supplier of every product, so record the batch as well. Print the date in an unambiguous format such as ISO 8601 (YYYY-MM-DD).
Common mistakes
- Covering the supplier's logistic label or GTIN barcode with your own label.
- Printing the ordered quantity instead of the quantity actually received and counted.
- Printing one label per order line when the line is spread over several pallets: every unit needs its own.
- Booking the receipt in the system before labelling, leaving physical goods on the dock with no identifier.
FAQ
Should the barcode hold the PO number or a unique ID?
The PO number is convenient but does not identify the individual pallet. If you need to track each unit, use a unique receipt ID or an SSCC.
Can this label replace the supplier's GS1 label?
No, it is for internal use. The supplier's GS1 label remains the reference towards the supplier and for any claims.
ZPL code
^XA
^PW799
^LL559
^CI28
^CF0,40^FO25,20^FD{{title_label}}^FS
^FO25,70^GB760,3,3^FS
^CF0,28^FO25,85^FDPO: {{po_number}}^FS
^CF0,26^FO25,125^FDSupplier: {{supplier}}^FS
^CF0,26^FO25,162^FDDate: {{date}}   Qty: {{quantity}}^FS
^CF0,24^FO25,200^FDItem: {{item_code}}^FS
^BY3,2,90
^FO25,245^BCN,90,Y,N,N^FD{{po_number}}^FS
^XZ- Industry: Warehouse
- Category: Inventory
- DPI: 203
- Size: 100×70 mm
- Tags: Code 128, Goods receipt, Inventory, Warehouse
What this label contains
Barcodes
- Code 128
- High-density linear barcode that encodes the full ASCII set: ideal for tracking numbers, internal codes and alphanumeric IDs.
Elements
- 5 text fields
- 6 variable fields to fill in
- boxes and separator lines
Variable fields
| Field | Description | Example |
|---|---|---|
title_label | Title | GOODS RECEIPT |
po_number | PO | PO-2026-88210 |
supplier | Supplier | Company Supplies |
date | Date | 03/06/2026 |
quantity | Quantity | 120 pcs |
item_code | Item | ITM-44021 |
Format and printing
100×70 mm (3.94×2.76″) at 203 dpi: 799×559 dots. Landscape.
Compatible Zebra printers
You need a printer with a 4″ printhead at 203 dpi, for example:
- Zebra ZD421 (desktop)
- Zebra ZD621 (desktop)
- Zebra GK420 (desktop)
- Zebra ZT231 (industrial)
- Zebra ZT411 (industrial)
- Zebra ZT610 (industrial)
- Zebra ZQ521 (mobile)
- Zebra ZQ630 (mobile)
Any Zebra printer with a wider printhead and the same resolution works too.
The code is written for 203 dpi: on a printer with a different resolution the label prints larger or smaller and needs rescaling.
How to use it
- Open “Customize placeholders” and enter your data in the variable fields listed above.
- Check the preview: it is rendered from the same ZPL code you will send to the printer.
- Download the .zpl file or copy the code and send it to the printer: with “Print” through Zebra Browser Print, or as a raw file to port 9100 if the printer is on the network.
- Load 100×70 mm labels and make sure the printer is set to 203 dpi. For a different size use “Duplicate & edit” and adapt the layout in the builder.
Edit it in the editor
To change the layout, use “Duplicate & edit”: the template opens in the online ZPL editor, where you modify it and save it to your account for free.
Related templates
- Multi-level bay location — 100×50 mm 203 dpi · Warehouse · Location
- Single rack location — 50×30 mm 203 dpi · Warehouse · Location
- Shelf-edge / bin label — 40×20 mm 300 dpi · Warehouse · Location
- Pick face label with QR — 60×40 mm 203 dpi · Warehouse · Picking
- GS1 SSCC pallet — 100×150 mm 203 dpi · Warehouse · SSCC
- Cross-dock receiving — 100×70 mm 203 dpi · Warehouse · Cross-docking
- Annual inventory serial — 60×40 mm 203 dpi · Warehouse · Inventory
- Zone / aisle sign — 100×50 mm 203 dpi · Warehouse · Location