Event/conference badge — 100×70 mm
Lanyard badge for trade shows and conferences: event name, attendee, role, company, access level and verification QR.
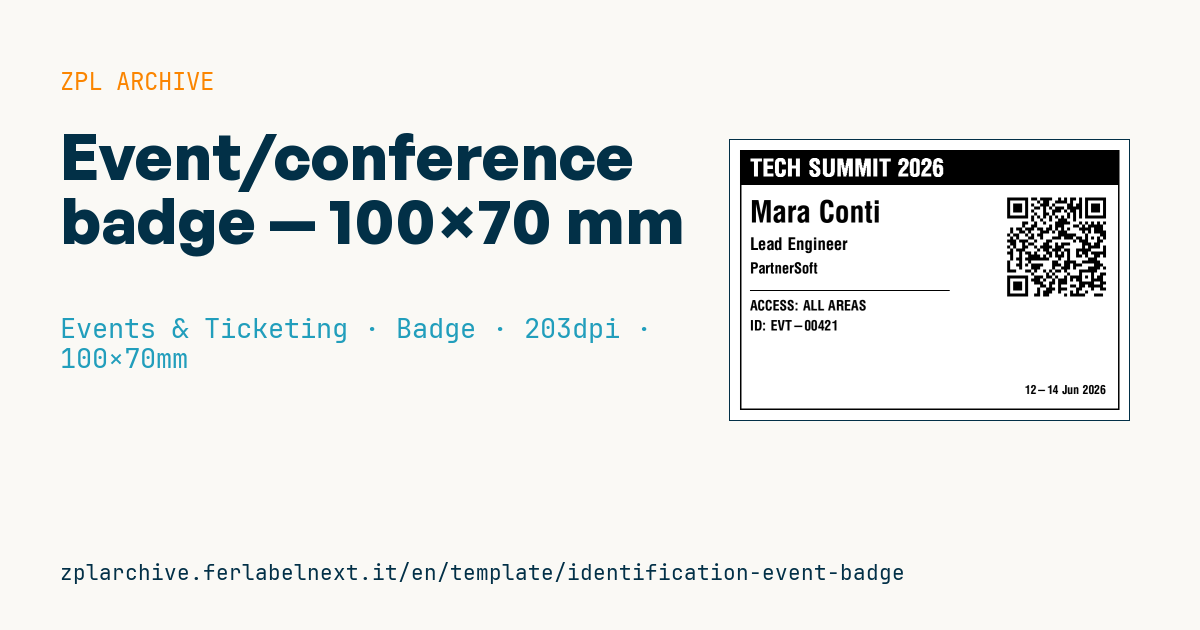
Event badge
100×70 mm format worn on a lanyard. Black banner with the event name for recognizability, QR for verification and session check-in.
Placeholders
event_name— event name (banner)full_name— attendeejob_title,companyaccess_level— e.g.ALL AREAS,SPEAKER,STAFFbadge_id— unique badge idbadge_url— URL in the QR (verify/check-in)event_date
When to use it
Organisers of trade shows, conferences, corporate conventions and workshops use this badge for credentials printed at check-in or in advance. It is worn on a lanyard for one to three days, so direct thermal paper is fine; for longer or outdoor events use synthetic stock or a label inside a badge pocket. Printing on demand at the desk saves you preparing and sorting hundreds of badges.
Standards and requirements
There is no specific standard; readability and privacy are what matter. The name must be legible at 1-2 metres, so use the scalable ^A0 font at least 8-10 mm high; for long names use ^FB to wrap or shrink the text. Names with ñ, ü, ç or ł need ^CI28 and UTF-8 data.
Under the GDPR, put an opaque identifier (a token or the badge_id) in the QR rather than an email or phone number, since anyone who photographs the badge can read it. If exhibitors scan the QR for lead retrieval, tell attendees.
Common mistakes
- Making the name small compared with the logo and event title, so nobody can read it.
- Placing the QR where the lanyard clip or slot covers it.
- Duplicate
badge_idvalues across reprints, so check-in can no longer tell the badges apart. - Encoding personal data in clear text in the QR without informing attendees.
FAQ
What media should I use for event badges?
Direct thermal paper is fine for events lasting a few days. For longer or outdoor events, or a keepsake badge, use thermal transfer on coated or synthetic stock.
What should the badge QR contain?
A unique code that the registration system links to the attendee. That way you can revoke a lost badge without reprinting personal data.
How do I handle very long names?
Use ^FB to set the width and number of lines, or reduce the font height for that field only while keeping the surname readable.
ZPL code
^XA
^LL559
^CI28
^PW800
^FO20,20^GB760,520,3^FS
^FO20,20^GB760,70,70^FS
^CF0,48^FO40,37^FR^FD{{event_name}}^FS
^CF0,60^FO40,120^FD{{full_name}}^FS
^CF0,34^FO40,195^FD{{job_title}}^FS
^CF0,30^FO40,245^FD{{company}}^FS
^FO40,300^GB400,2,2^FS
^CF0,28^FO40,320^FDACCESS: {{access_level}}^FS
^FO40,360^FDID: {{badge_id}}^FS
^FO555,105^BQN,2,6^FDQA,{{badge_url}}^FS
^CF0,24^FO590,490^FD{{event_date}}^FS
^XZ- Industry: Events & Ticketing
- Category: Badge
- DPI: 203
- Size: 100×70 mm
- Tags: Access control, Badge, Event, Identification, QR Code
What this label contains
Barcodes
- QR Code
- 2D code for links, text and structured data, readable by any smartphone.
Elements
- 7 text fields
- 8 variable fields to fill in
- boxes and separator lines
Variable fields
| Field | Description | Example |
|---|---|---|
event_name | Event | TECH SUMMIT 2026 |
full_name | Name | Mara Conti |
job_title | Job title | Lead Engineer |
company | Company | PartnerSoft |
access_level | Access | ALL AREAS |
badge_id | Badge id | EVT-00421 |
badge_url | Badge URL | https://summit26.example/b/EVT-00421 |
event_date | Date | 12-14 Jun 2026 |
Format and printing
100×70 mm (3.94×2.76″) at 203 dpi: 799×559 dots. Landscape.
Compatible Zebra printers
You need a printer with a 4″ printhead at 203 dpi, for example:
- Zebra ZD421 (desktop)
- Zebra ZD621 (desktop)
- Zebra GK420 (desktop)
- Zebra ZT231 (industrial)
- Zebra ZT411 (industrial)
- Zebra ZT610 (industrial)
- Zebra ZQ521 (mobile)
- Zebra ZQ630 (mobile)
Any Zebra printer with a wider printhead and the same resolution works too.
The code is written for 203 dpi: on a printer with a different resolution the label prints larger or smaller and needs rescaling.
How to use it
- Open “Customize placeholders” and enter your data in the variable fields listed above.
- Check the preview: it is rendered from the same ZPL code you will send to the printer.
- Download the .zpl file or copy the code and send it to the printer: with “Print” through Zebra Browser Print, or as a raw file to port 9100 if the printer is on the network.
- Load 100×70 mm labels and make sure the printer is set to 203 dpi. For a different size use “Duplicate & edit” and adapt the layout in the builder.
Edit it in the editor
To change the layout, use “Duplicate & edit”: the template opens in the online ZPL editor, where you modify it and save it to your account for free.
Related templates
- Press pass — 100×70 mm 203 dpi · Events & Ticketing · Accreditation & access
- Event admission ticket — 100×50 mm 203 dpi · Events & Ticketing · Tickets
- Boarding pass (PDF417) — 100×60 mm 203 dpi · Events & Ticketing · Tickets
- Concert seated ticket — 100×60 mm 203 dpi · Events & Ticketing · Seating & cloakroom
- Retail gift card with logo — 65×40 mm 300 dpi · Events & Ticketing · Vouchers & tokens
- Gift voucher — 85×54 mm CR80 300 dpi · Events & Ticketing · Vouchers & tokens
- Cashless festival wristband — 250×25 mm 203 dpi · Events & Ticketing · Accreditation & access
- Drink token — 40×40 mm 203 dpi · Events & Ticketing · Vouchers & tokens